


(5)
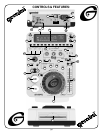
(18) AUTO CUE SINGLE/CONTINUOUS
: Pressing the AUTO CUE
SINGLE/CONTINUOUS (18) button activates the AUTO CUE FUNCTION.
The AUTO CUE FUNCTION causes the unit to pause at the beginning of
music of the following track and allows you to start play immediately
from the start of music without any blank space (which exists at the
beginning of every track). Pressing the AUTO CUE SINGLE/
CONTINUOUS (18) button a second time activates the
CONTINUOUS
function causing the unit to play continuously (after the last track, the
unit will return to the first track of the disc and continue to play).
Pressing the AUTO CUE SINGLE/CONTINUOUS (18) button a third time
deactivates the CONTINUOUS function.
(19) SET CUE
: Use the SET CUE (19) button to activate the DIRECT
ACCESS (9) buttons to set a CUE POINT. See the CUE INSTRUCTIONS
section for more information.
(20) HOT STARTS CUE 2-4
: The CD-1800X allows you to set up to 3
different CUE POINTS using the
HOT STARTS CUE 2-4 (20). To set
each individual CUE POINT, press the SET CUE (19) button and then a
cue button (CUE 2-4). You can keep setting CUE POINTS up to 3. As
your music is playing, if you would like it to jump to one of your set CUE
POINTS, simply press that individual CUE button (Cue 2-4) and the
music will jump to that point.
(21) ROBOSTART
: Press the ROBOSTART (21) button to activate
ROBOSTART function. Use ROBOSTART in AUTO CUE-SINGLE mode
to alternate play between the two sides of the CD player (one track from
one side, then one track from the other side). See the
ROBOSTART
INSTRUCTIONS
section for further instructions.
(22) MASTER TEMPO BUTTON
:
The
MASTER TEMPO BUTTON
(22)
control locks in the music’s pitch even when the tempo changes. You
can vary the beat with no change in vocal or instrument tone.
(23) PITCH
: Pushing the PITCH (23) button activates the PITCH
CONTROL SLIDE (25).
(24) VPS (VARIABLE PITCH SELECTOR) 4%, 8% & 16%
: Use the
VPS (24) button to assign the PITCH percent the PITCH CONTROL
SLIDE will have. Pressing the VPS (24) button once will assign 4%, 8%,
& 16% to the PITCH CONTROL SLIDE (25). The PITCH (23) button
must be ON for the VPS (24) button to have any effect on the PITCH
CONTROL SLIDE (25).
(25) PITCH CONTROL SLIDE
: The pitch of the CD will change according
to the position of the PITCH CONTROL SLIDE (25).
(26) BPM/PITCH (PITCH BEND - or +)
: BPM/PITCH (26) button(s) has
two modes: BPM or PITCH BEND. Pressing both buttons
simultaneously will change the mode to BPM, using the PITCH
CONTROL SLIDE (25) will raise or lower the BPM or PITCH, this can
be used when the PITCH (23) button is off by using the PITCH BEND
buttons. When in either mode the button(s) for BPM/PITCH (26) will
raise or lower the PITCH or BPM percentage + or - 4% from the
existing setting. When using the BPM/PITCH (26) button(s) the PITCH
(23) LED will flash. The DISPLAY (4) shows levels for the active
function.
(27-32) EFFECTS
:
The EFFECTS BUTTONS (27-32) allow you to select one of five
different effects: ZOOM (27), FILTER (28), REVERSE (29), BRAKE
(30), and SCRATCH (32).
(27) ZOOM
: The ZOOM (27) effect changes the delay time by rotating
the jog wheel, mixing a short delay with the playback sound. This
function allows you to produce the sound of a JET ENGINE
(FLANGER EFFECT) using a single CD Player. When held down the
DISPLAY (4) shows the effects parameters for precise tuning.
(28) FILTER
: The FILTER (28) effect allows you to change the CUT OFF
FREQUENCY of the playback sound when the jog wheel is rotated.
This allows the DJ to extract and play back specific parts from the
playback sound. When held down the DISPLAY (4) shows the effects
parameters for precise tuning.
(29) REVERSE
: The REVERSE (29) effect plays your musical selection
BACKWARDS. When the effect is activated the music will play
BACKWARDS until it is released.
(30) BRAKE
:
The
BRAKE (30) button simulates the effect of a turntable
slowing down to a stop.
(31) HOLD
: Press HOLD (31) to hold an effect after pressing either
ZOOM (27) or FILTER (28). To release press the HOLD (31) button
again.
(32) SCRATCH
: The SCRATCH (32) effect makes it possible for the JOG
WHEEL (10) to “SCRATCH” the music as it plays. If you move the
wheel back and forth the music will stop and play slowly as the wheel
is moved, similar to scratching a record. When the wheel stops moving
the music will continue.
OPERATING INSTRUCTIONS:
1. Make sure that the VOLTAGE SELECTOR (36) switch, found on the rear
panel, is set for the proper voltage. Plug the unit in and press the
POWER (1) switch.
2. Place a CD in the DISC IN/OUT SLOT (2).
3. Push the TRACK SKIP (7) buttons to select the track you want to play.
4. Press the PLAY/PAUSE (6) button and the unit will instantly play.
CUE INSTRUCTIONS:
1. To memorize the spot at which you want play to start, the CUE POINT,
select the proper track, and then push the PLAY/PAUSE (6) button so
the unit goes into PLAY mode (the PLAY/PAUSE LED will glow). Listen
to the CD and when the CD gets to the approximate spot, push the
PLAY/PAUSE (6) button so the unit goes into PAUSE mode (the PLAY/
PAUSE LED will blink). Move the JOG WHEEL (10) or use the SEARCH
DIAL (8) to find the precise spot you want play to begin, and push the
PLAY/PAUSE (6) to memorize the CUE POINT. Press CUE 1/PREVIEW
(16) to return to the memorized CUE POINT in PAUSE mode, and then
push PLAY/PAUSE (6) to play from the CUE POINT. Or you can press
the HOT START CUE1 (17) button to return to and instantly play from the
saved CUE POINT.
To use FLY CUE (13) to set a CUE POINT, follow these instructions:
1. With the unit in the PLAY mode (PLAY/PAUSE LED glows green), press
FLY CUE (13) at the point where you want the cue point to be (the unit
will continue to play). The CUE POINT is now memorized. Press the CUE
1/PREVIEW (16) button to return to the memorized CUE POINT. Push the
PLAY/PAUSE (6) button, and the unit will instantly play from the spot
selected.
AND/OR:
To use the SET CUE (19) button and the DIRECT ACCESS (9) buttons
to set a CUE POINT, follow these instructions:
1. Press the SET CUE (19) button (the set cue LED will light). Use the
DIRECT ACCESS (9) buttons to memorize the spot at which you want
play to start, the CUE POINT, by selecting the proper TRACK, MINUTE,
SECOND and FRAME. Push the CUE 1/PREVIEW (16) button to set the
CUE. You can do this in any mode, including PLAY mode, so that you
may cue a track while playing a track. Press the CUE 1/PREVIEW (16)
button again to return to the memorized CUE POINT in PAUSE mode, and
then push PLAY/PAUSE (6) to play from the CUE POINT. Or you can
press the RETURN (15) button to return to and instantly play from the
saved CUE POINT (if you do not have a loop saved).
SUGGESTION: TO AVOID CONFUSION WHILE SETTING CUE POINTS, KEEP THE TIME
DISPLAY IN ELAPSED TIME MODE. WHEN YOU USE THE DIRECT ACCESS BUTTONS TO
SET A CUE, THE TRACK, MINUTE, SECOND AND FRAME ARE ALWAYS IN ELAPSED TIME.
IF THE UNIT’S TIME DISPLAY IS IN TRACK REMAIN OR TOTAL REMAIN MODE, THE
TRACK, MINUTE, SECOND AND FRAME DISPLAYED WILL BE THE REMAIN TIME AND NOT
THE TRACK, MINUTE, SECOND AND FRAME YOU ENTERED.