


(4)
INTRODUCTION:
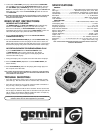
Congratulations on purchasing a Gemini CD-1800X CD player. This
state of the art professional CD player is backed by a three-year
warranty, excluding lasers. One-year warranty on CD lasers. Prior to
use, we suggest that you carefully read all the instructions.
CAUTIONS:
Do not use this CD player at temperatures below 41°F/5°C or
higher than 95°F/35°C.
The apparatus should not be exposed to dripping or splashing and no
objects filled with liquids such as vases should be placed on the
apparatus.
Place the unit in a clean and dry location.
Do not place the unit in an unstable location.
When disconnecting the power cord from an AC outlet, always grasp it
by the plug. Never pull the power cord.
To prevent electric shock, do not remove the cover or the bottom screws.
There are no user serviceable parts inside. Please refer
servicing to a qualified technician.
Do not use chemical solvents to clean the unit.
Keep this manual in a safe place for future reference.
SAFETY CERTIFICATIONS:
Laser Diode Properties
Material: Ga - Al - As
Wavelength: 755 - 815 nm (25° C)
Laser Output: Continuous Wave, max. 0.5mW
LINE VOLTAGE SELECTION:
Model CD-1800X is a dual voltage unit. It will operate at 115 or 230
volts. To set the proper voltage, follow these steps:
1. Place the head of a screwdriver in the center of the VOLTAGE
SELECTOR SWITCH (36) found on the rear panel.
2. Slide the switch left for 115 volts or push the switch right for 230 volts.
3. Do not force or twist the switch. Excessive force may cause
damage. If the switch does not move smoothly, contact a
qualified technician.
CONNECTIONS:
1. Plug one end of a set of RCA connectors into each of the LINE
OUTPUT JACKS (34).
2. Plug the other end of the RCA connectors into any available line level
input jacks on your mixer. If you are playing the CD-1800X through a
receiver, you can plug the RCA connectors into the CD or AUX input
jacks on your receiver. If there are no CD or AUX inputs, use any line
level (except phono) inputs.
3. The DIGITAL OUTPUT- BNC (33) jacks are for connecting to any type of DAT,
MD, HARD DRIVE, or any other type of device that accept digital signals.
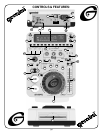
FUNCTION DESCRIPTIONS:
DSP (DIGITAL SIGNAL PROCESSING)
: CD player uses state of the art
DSP technology to process the sound.
ANTI-SHOCK BUFFER MEMORY
: With 6 seconds of ANTI-SHOCK
BUFFER MEMORY the CD player stores 6 seconds of future play to
ensure that any harsh movement or bumping of the unit will not
interrupt play and play will continue smoothly.
(1)POWER
: After making sure that the VOLTAGE SELECTOR SWITCH
(36), found on the rear panel, is properly set, plug the unit in and press
the POWER (1). The unit will turn on. Pushing the POWER (1) again will
turn the unit off.
(2)DISC IN/OUT SLOT
: Insert the CD into the slot and the unit will
automatically load the disc into the drive mechanism.
NOTE: DO NOT FORCE A DISC INTO THE SLOT WHEN THE POWER TO THE UNIT IS OFF!
(3)DISC IN/OUT
(3):
LED will flash green, and stay lit when loading a CD.
(4)DISPLAY
: The DISPLAY (4) shows the TRACK number, PITCH
VALUE, SINGLE-AUTO CUE, CONTINUE (for continuous play), and 3
different time displays. These time displays are TIME ELAPSED on the
track, TOTAL TIME REMAINING on the disc and TIME REMAINING on
the track. Time is measured in MINUTES, SECONDS and FRAMES.
(5)PLAYBACK DISPLAY
: The PLAYBACK DISPLAY (5) displays the
time remaining to play or how long track has been playing for.
PLAYBACK DISPLAY (5) flashes slowly when the track has 30
seconds left and quickly when the track has 15 seconds left.
(6)PLAY/PAUSE
: Each press of the PLAY/PAUSE (6) button causes
the operation to change from PLAY to PAUSE or from PAUSE back to
PLAY. See the CUE INSTRUCTIONS section for more information.
(7)TRACK SKIP
: The TRACK SKIP (7) buttons let you select the
track to play.
(8)SEARCH DIAL
: Use the SEARCH DIAL (8) to select the
scanning direction and speed. Turning the dial in the clockwise
direction will scan forward and counter clockwise will scan in reverse.
The scanning speed increases, as the dial is turned further.
(9)DIRECT ACCESS
: Use the DIRECT ACCESS (9) buttons to select
what track to play and to set a CUE POINT. See the
CUE
INSTRUCTIONS
section for more information.
(10) JOG WHEEL
: The JOG WHEEL (10) has various functions. Use the
JOG WHEEL (10) to make fine adjustments in pause mode. Use the JOG
WHEEL (10) to bend the pitch for precise synchronization in play mode,
for scratching, and adjustments to cue and effects parameters.
(11) STOP/EJECT
: STOP/EJECT (11) ends the playback of the CD.
Press once to stop, twice to eject, or hold to eject the CD.
(12) TIME
: The TIME BUTTON (12) switches the time display between
the three available choices listed under DISPLAY (4).
(13-15) SEAMLESS LOOP BUTTONS
:
(13) FLY CUE
: The FLY CUE (13) function lets you set cues on the fly
with one press of a button. With the unit in the PLAY mode
(PLAY/PAUSE LED glows green), press FLY CUE (13) at the point
where you want the CUE POINT to be (the unit will continue to play).
The CUE POINT is now memorized. Press the CUE (16) button to return
to the memorized CUE POINT. Push the PLAY/PAUSE (17) button, and
the unit will instantly play from the spot selected.
(14)
CUE 1-B/EXIT
: After a CUE POINT is memorized, pressing the
CUE 1 B/EXIT BUTTON (14) in play mode, repeats the section between
the CUE POINT and the point where the CUE B/EXIT (14) button was
pressed. Press the CUE B/EXIT (14) button again or pause play to exit
the repeating play.
(15)
RETURN
: The RETURN (15) button has two functions. To return to a
previously saved LOOP from normal play, press the RETURN (15) button
after saving the LOOP. To return to and instantly play from a previously
saved CUE POINT, press the RETURN (15) button after setting the
CUE POINT (if you do not have a LOOP saved).
(16) CUE 1/PREVIEW
: With the unit in PLAY mode (the PLAY/PAUSE LED
will glow), and after the CUE POINT has been set, pressing the CUE 1/
PREVIEW
(16) button will cause the CD player to enter PAUSE mode
(the PLAY/PAUSE LED will blink) at the memorized CUE POINT (the CUE
LED glows yellow). Holding down the CUE (10) button changes the
CUE 1/PREVIEW
(16) function to PREVIEW allowing you to hear the
music play from the CUE POINT. Releasing the CUE 1/PREVIEW
(16)
button returns you to the preset CUE POINT.
(17) HOT START CUE1
: When you set a CUE POINT using the CUE1/
PREVIEW (16) or FLY CUE (13) button you can return to that CUE
POINT at any time during the musical performance simply by pressing
the HOT START CUE1 (17) button. The music will immediately return to
that point.