


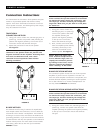

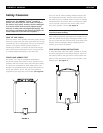
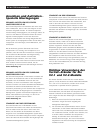
2) Next, connect the second cable, from the amplifiers
other channel to the lower set of terminals again
ensuring a tight connection.
3) Repeat Steps 1 and 2 for the second loudspeaker
using the second amplifier. See Figure 5.
NOTE: Notice the upper and lower terminals
accept the wire from a different angle, this is to
simplify the connection process by making access
easier, and to improve cosmetics by allowing easier
“dressing” of the cables.
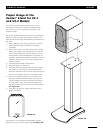
Connecting the Veritas
™
2.0R Rear Channel
Surround Speaker
NOTE: The four connectors on the V2.0R speaker
differ slightly from the other models.
PLEASE READ THIS SECTION CAREFULLY.
Under normal circumstances, you will never have the
need to bi-wire, or bi-amplify the rear channel speakers in
a typical home theater system. If you are unsure, in the
meantime you may choose to connect them using the
Standard Connection Method described below. Ask your
authorized ENERGY
®
Veritas
™
dealer if there are any
questions about your systems' particular needs.
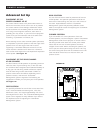
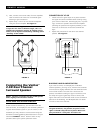
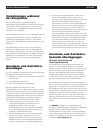
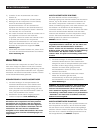
CONNECTION OF V2.0R
1. Please ensure the gold straps are in place between
the upper and lower terminals before starting. Using
your choice of bare wire, banana-type jacks, or spade
lugs, connect the speaker cable from the amplifier
(minding the positive and negative polarities), to the
lower set of connectors. Ensure the terminals are
tight.
2. Repeat the procedure for the other rear channel
speaker. See Figure 6.
BI-WIRING AND BI-AMPLIFICATION
If you wish to bi-wire, or bi-amplify the V2.0R Rear
Channel speakers, you may do so, however the terminals
on the back are slightly different from the terminals found
on the other models. The same four connectors are
present, the difference being the type of connector, and
the shape and type of gold-strap used to connect the
upper and lower set of terminals. Refer to the Connection
Instructions for Bi-Wiring, and Bi-Amplification for details
on how to wire in this manner.
NOTE: To remove the straps from V2.OR, loosen
the gold terminals, and pull the strap out to the
right. It should easily fall out of place. Make sure
you put them in a safe place for future use.
–
+
–
+
OWNERS MANUAL VERITAS
™
9
FIGURE 6
–
+
–
+
FIGURE 5