


Safety Concerns
IMPORTANT: Please retain the carton and packing
materials for this ENERGY
®
Veritas
™
product to
protect it in the event you ever need to transport
the unit for any reason. Product received damaged
at a service center that has been shipped by the
end user in other than the original packaging, will
be repaired, refurbished and properly packaged for
return shipment at the end user's expense.
CARE OF THE FINISH
Your new Veritas
™
series speakers should be gently cleaned
with only a damp cloth and warm water from time to time
to remove any dust or fingerprints. Do not use an abrasive
cleaner, or any type of ammonia based cleaners, or
window type cleaners. To remove the dust from the grill
cloth, use the brush attachment on your vacuum cleaner
or a slightly dampened sponge or dust free cloth.
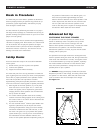
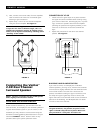
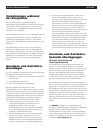
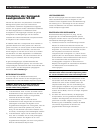
SPIKED AND RUBBER FEET
The Veritas
™
V2.1 and V2.2 bookshelf loudspeakers
include two rubber feet. These are to be attached to the
speaker in the front corners when used with other stands,
or if placed on a bookshelf or other stable surface. The
bumpers are self adhesive and will protect the speaker as
well as the surface it sits on. The rear of the speaker is
supported by the single rest in the middle. See Figure 8.
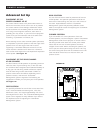
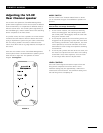
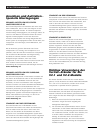
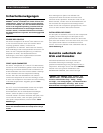
The V2.3 and V2.4 floor standing models however have
four metal spikes included, with five insert locations. Use
the spikes only on a carpeted surface as they can damage
hardwood floors. You have a choice of using three spikes,
two in the front, one in the rear, or four spikes, one in
each of the speakers' corners. See Figure 9.
NOTE: Use the four spike option if you are
concerned about stability.
After installing the spikes and locating the speaker, do not
move the speaker by any type of dragging motion. It can
not only scratch the floor, but the inserts in the base of the
speaker could be damaged. Always completely lift the
speaker up to relocate its position.
SPIKE INSTALLATION INSTRUCTIONS
To insert the spikes, place the speaker carefully on its side,
and insert the spikes into the desired locations. Then turn
the spike by hand to the right until it is firmly seated. The
spikes can also be used as levelers in case the floor is not
perfectly level. See Figure 9.
OWNERS MANUAL VERITAS
™
13
FIGURE 8
FIGURE 9
5
1
2
3
4