


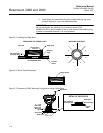
Reference Manual
00809-0100-4690, Rev EA
March 2007
3-9
Rosemount 2088 and 2090
Rosemount 2090P Installing the Rosemount 2090P transmitter involves attaching a weld spud to
the tapped process vessel, attaching the transmitter to the weld spud, and
making electrical connections. If you intend to use an existing weld spud,
proceed to the transmitter section of this installation procedure.
NOTE
The Rosemount 2090P Isolating Diaphragm can be mounted flush with the
inside diameter of any vessel larger than three inches in diameter.
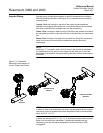
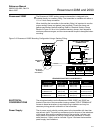
Weld Spud
1. Using the appropriate size hole saw, cut a hole in the process vessel
to accept the weld spud. The diameter for a weld spud with heat
isolator groove is 2.37 inch (60 mm); when compatible with 1-in.
PMC
®
process connection style spud, diameter is 1.32 in. (33,4 mm).
The hole should produce a tight, uniform fit when coupled with the
weld spud.
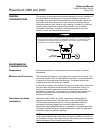
2. Bevel the edge of the vessel hole to accept filler material (see Figure
3-5).
3. Remove the weld spud from the transmitter and remove the Teflon
®
gasket from the weld spud.
4. Position the weld spud in the vessel hole, place heat sink and tack
spud in place using the welding sequence shown in Figure 3-5. Cool
each section with a wet cloth before proceeding to the next section.
5. Weld the spud in place using 0.030 to 0.045 in. (0,762 to 1,143 mm)
stainless steel rod as filler in the bevelled area. Using between 100
and 125 amps., adjust the amperage for 0.080 in. (2,032 mm)
penetration.
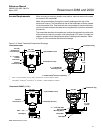
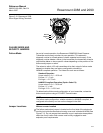
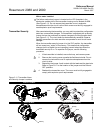
Transmitter
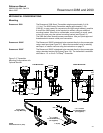
1. After the weld spud has cooled, remove the heat sink and install the
Teflon gasket into the weld spud. Ensure that the gasket is properly
positioned within the weld spud; improper placement could cause a
process leak (see Figure 3-6).
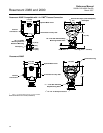
2. Position the transmitter into the spud and begin to engage the
threads. Rotate the transmitter prior to seating the threads completely
to enable access to the housing compartments, the conduit entry, and
the local indicator.
Installation of the weld spud should be performed by a skilled welder using a TIG welder.
Improper installation may result in weld spud distortion.
Excessive heat will distort the weld spud. Weld in sections, as shown in Figure 3-5,
cooling each section with a wet cloth. Allow adequate cooling between passes.
To reduce the chances of distorting the weld spud (for 1.5-in. connection), use a heat
sink—Rosemount Part Number 02088-0196-0001.