


12
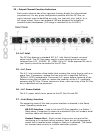
10 Store Button
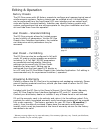
Pressing the Store button while in Run mode displays the Store Preset screen
in the LCD display and the Store button lights. In this screen edited presets
can be named and saved to a user preset location. Pressing the Store button
again completes the preset save operation.
To exit without storing the current preset, press the Edit or Setup buttons to
return to the Run mode screen.
11 – Recall Button
Pressing the Recall button while in Run mode displays the Recall Preset screen
in the LCD display and the Recall button lights. In this screen, any of the 60
factory and 20 user presets can be recalled into current memory. Pressing the
Recall button again completes the preset load operation and returns the LCD
display to Run mode.
To exit without recalling a preset, press the Edit Or Setup buttons to return to
the Run mode screen.
12 – Input HPF Button
Pressing the HPF button places the current preset in Edit mode and jumps to
the Hi-Pass Filter screen of Input A. Subsequent button presses toggle the
display between Input A and Input B.
13 – Input PEQ Button
Pressing the PEQ button places the current preset in Edit mode and jumps to
the first screen of the Input Parametric Equalizer. Subsequent button presses
toggle the display between Input A and Input B.
14 – Input GEQ Button
Pressing the GEQ button places the current preset in Edit mode and jumps to
the the Input Graphic Equalizer screen. Subsequent button presses toggle the
display between Input A and Input B.
15 – Input Delay Button
Pressing the Delay button places the current preset in Edit mode and jumps
to the Input Delay screen. Subsequent button presses toggle the display
between Input A and Input B.
16 – Output X-Over Button
Pressing the X-Over button places the current preset in Edit mode and jumps
to the first Output Channel Cross-Over screen. Subsequent button presses
step through the six output channels.