


34
Outlaw Audio
Owner’s Manual
35
Model 950 7.1 Channel Preamp/Processor
Owner’s Manual
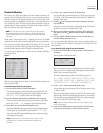
To enter 6 Channel Direct mode:
1. Press the 6 CH button on the remote control.
The Model 950 is set to Bypass mode, circumventing any internal sur-
round processing. The Front Panel Display and OSD display will read:
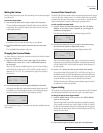
DIRECT BYPASS
6 CH INPUT 00dB
2. Press the 6 CH button again to turn off 6 Channel Direct mode, or
use the Source selection buttons on the remote or front panel to
select another source.
If you use the remote 6 CH button, the unit will return to the previously
chosen source and settings.
Setting the Front Panel Display Brightness
This control sets the Front Panel Display brightness. The default display bright-
ness is set to be easily visible in a normally lit room. If you prefer to dim the
display, for example, during movie viewing in a darkened room, you can access
the VFD Brightness setting from the System Conguration menu.
To set the Front Panel Display brightness:
1. Press the MENU button to enter the Main Menu.
The Main Menu appears on the Front Panel Display and the OSD. The
cursor on the OSD should be pointing to the Input Conguration menu
and
INPUT CONFIG
appears on the Front Panel Display.
2. Press the button until System Conguration is selected.
The cursor on the OSD should be pointing to the System Conguration
menu and
SYSTEM CONFIG
appears on the Front Panel Display.
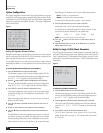
3. Press the SELECT button to enter the System Conguration menu.
The System Conguration menu appears on the Front Panel Display
and the OSD (see gure 4 on page 28). The selected menu item should
be
FRONT DISTANCE
.
4. Press the button until the VFD Brightness menu is selected.
5. Use the < and > buttons to choose between Full and Half.
6. After making your selection, press the button twice to exit the
Main Menu.
Setting the On Screen Display (OSD) Time Out
This menu is used to set how long the ON SCREEN DISPLAY will remain visible
after a button is pushed or setting is changed.
IMPORTANT NOTE: When the time is set to 0Sec the OSD will not appear.
To set the OSD Time Out:
1. Press the MENU button to enter the Main Menu.
The Main Menu appears on the Front Panel Display and the OSD. The
cursor on the OSD should be pointing to the Input Conguration menu
and
INPUT CONFIG
appears on the Front Panel Display.
2. Press the button until System Conguration is selected.
The cursor on the OSD should be pointing to the System Conguration
menu and
SYSTEM CONFIG
appears on the Front Panel Display.
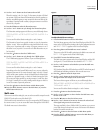
3. Press the SELECT button to enter the System Conguration menu.
The System Conguration menu appears on the Front Panel Display
and the OSD (see gure 4 on page 28). The selected menu item should
be
FRONT DISTANCE
.
4. Press the button until the OSD Time Out menu is selected.
5. Use the < and > buttons to cycle through the available options.
The following times appear as you scroll through them:
30Sec25Sec20Sec15Sec10sec5Sec
3Sec0sSec
6.
After making your selection, press the button twice to exit the Main Menu.
Sleep Timer
This option allows you set how long the unit will remain on before automati-
cally shutting off. This mode can be accessed using the SLEEP button on the
remote control, or from System Conguration menu.
To set the Sleep Timer from the Main Menu:
1. Press the MENU button to enter the Main Menu.
The Main Menu appears on the Front Panel Display and the OSD. The
cursor on the OSD should be pointing to the Input Conguration menu
and
INPUT CONFIG
appears on the Front Panel Display.
2. Press the button until System Conguration is selected.
The cursor on the OSD should be pointing to the System Conguration
menu and
SYSTEM CONFIG
appears on the Front Panel Display.
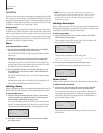
3. Press the SELECT button to enter the System Conguration menu.
The System Conguration menu appears on the Front Panel Display
and the OSD (see gure 4 on page 28). The selected menu item should
be
FRONT DISTANCE
.
4. Press the button until the Sleep Time Set menu is selected.
5. Use the < and > buttons to cycle through the available choices.
The following times appear as you scroll through them:
60Min50Min40Min30Min20Min10Min5Min
6. After making your selection, Press the button twice to exit the
Main Menu.
To set the Sleep Timer using the SLEEP button:
1. Press the SLEEP button on the remote control.
The Front Panel Display and the OSD will show the following:
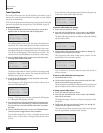
DVD DOLBY D
SLEEP TIME SET: 0Min
2. Press the SLEEP button repeatedly to cycle through the time
remaining options.
The following times appear as you press the SLEEP button:
60Min50Min40Min30Min20Min10Min5Min
The Sleep Timer menu will disappear automatically approximately 5
seconds after you make your selection.
Operation