


22
Outlaw Audio
Owner’s Manual
23
Model 950 7.1 Channel Preamp/Processor
Owner’s Manual
System Setup
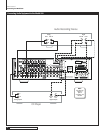
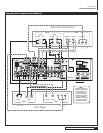
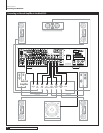
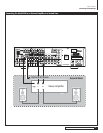
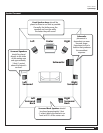
At this point you should have made all the necessary physical connections
between the Model 950 and your source equipment, ampliers and speakers.
All that remains is to properly congure the system to reect your specic
equipment and room characteristics.
To turn the Model 950 on:
1. Plug the cord into an AC wall outlet or UL approved power strip or
surge protection device.
Make certain that the AC power cord supplied with the Model 950 is
rmly inserted into the socket on the unit’s rear panel.
2. Press the rear panel POWER switch to the On position to set the
Model 950 to Standby mode.
The Standby Indicator on the Front Panel will light up.
3. Press the front panel Standby Power button to turn on the Model
950 or press the AUD button on the remote control.
The FRONT PANEL DISPLAY will light up and the standby indicator
will turn off.
Navigating the Setup Menus
Setup of the Model 950 can be performed from the front panel of the unit, or
by using the remote control. Information is shown on the Front Panel Display,
or the On Screen Display (OSD). All selections are made using a combination
of the following buttons:
Front Panel
The MENU, Navigation ( <, >, and ) and SELECT
buttons below the Front Panel Display
Remote Control
The MENU, Navigation ( <, >, and ) and
SEL/PLAY buttons in the center of the remote.
These buttons will be referred to interchangeably, unless otherwise specied,
when referring to the Setup Menus.
The following example demonstrates how to navigate the Model 950 menu
system in general using the Speaker Conguration menu as an illustration.
For detailed information on a specic part of the setup process, consult the
pages relating to that topic.
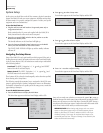
To use the Model 950 menu system:
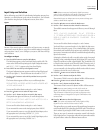
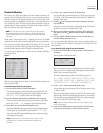
1. Press the MENU button to display the Main Menu.
The Main Menu appears on the Front Panel Display and the OSD:
MAIN MENU
INPUT CONFIG
MAIN MENU
> INPUT CONFIG
SPEAKER CONFIG
CHANNEL CALIB
CHANNEL CONFIG
SYSTEM CONFIG
MULTI-ZONE
PLII MUSIC PARAMETER
EXIT
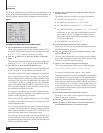
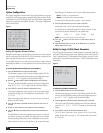
2. Press or to select a Setup menu.
Your selection appears on the Front Panel Display and the OSD:
SPEAKER CONFIG
FRONT :SMALL
SPEAKER CONFIG
> FRONT :SMALL
CENTER :SMALL
SURR :SMALL
SURR REAR :LB/RB
SUBWOOFER :ON
FRONT XOVER: 80Hz
CENTER XOVER: 80Hz
SURR XOVER: 80Hz
RETURN TO MAIN MENU
3. Press or to select an item to adjust.
Your selection appears on the Front Panel Display and the OSD:
SPEAKER CONFIG
CENTER :SMALL
SPEAKER CONFIG
FRONT :SMALL
> CENTER :SMALL
SURR :SMALL
SURR REAR :LB/RB
SUBWOOFER :ON
FRONT XOVER: 80Hz
CENTER XOVER: 80Hz
SURR XOVER: 80Hz
RETURN TO MAIN MENU
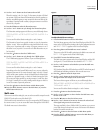
4. Press < or > to select or adjust a setting.
Your selection appears on the Front Panel Display and the OSD:
SPEAKER CONFIG
CENTER :LARGE
SPEAKER CONFIG
FRONT :SMALL
> CENTER :LARGE
SURR :SMALL
SURR REAR :LB/RB
SUBWOOFER :ON
FRONT XOVER: 80Hz
CENTER XOVER: 80Hz
SURR XOVER: 80Hz
RETURN TO MAIN MENU
Once you have made your selections, you can use the and to return to
the Main Menu and/or exit the menu system. Alternatively, pressing the MENU
button once will return you to the Main Menu. Pressing the MENU button a
second time will exit the menu system. Note that the menus will remain visible
on the Front Panel and OSD until you exit the menu system.
IMPORTANT NOTE: When viewing static images such as on screen
menus or video game images using a CRT-based projector, plasma
display or direct-view CRT monitor or television, there is a risk of per-
manently “burning in” the image. Do not leave these images on for
an extended period of time. This type of damage is not covered by the
Outlaw Audio Model 950 warranty.
System Setup