


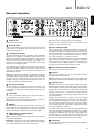


When designing our amplifiers we have tried to include features that
allow you to connect your system in various ways. The inclusion of
features such as Pre-Out and Speaker B connections mean that you
can flexibly configure your system depending on your requirements.
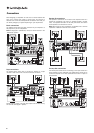
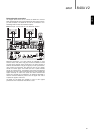
Basic connections
The diagram below shows the basic connection of your amplifier to a
CD player and a pair of loudspeakers.
Note: If using Input 1 (Unbalanced), the Input 1 switch must be in the
‘Unbalanced’ position.
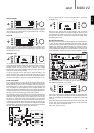
Tape connections
The diagram below shows how to connect the amplifier to a tape
recorder or other source with a record and monitor connection.
Please note that either of the tape loop outputs can be used (as they
are both the same signal in parallel).
8
Speaker B connections
The Speaker B connections on the back of the amplifier allow for a
second set of speakers to be used (i.e. speakers located in another
room). The Speaker A/B button on the front panel allows this second
set of speakers to be switched on and off.
Note: When using two pairs of speakers, use speakers with a nominal
impedance of between 6-8 ohms each minimum.
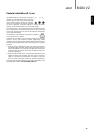
Preamp Out connections
The Preamp Out sockets are for connecting to the input sockets of a
power amplifier or active subwoofer. The diagram below shows how to
connect the amplifier to an active subwoofer via the Line In inputs on
the subwoofer.
Connections
840C
840A V2
Line
In
Active subwoofer
840C
840A V2
Rec
In
Rec
Out
Tape / MD player
840A V2
840A V2