


14
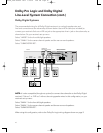
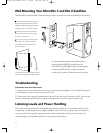
Install a #8 or #10 mounting screw on
the wall (not supplied–consult a knowl-
edgeable installer regarding the proper
hardware to use on your wall surface).
Attach the bracket to the back of
the speaker with the machine screw
and acorn nut as shown.
If you are running wires behind the
wall, make a
3
⁄8" (9.5mm) wire hole,
1
3
⁄4" (44mm) below the mounting
screw for the wire.
1
1
2
3
2
3
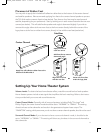
An optional pedestal shelf stand/wall-mount
bracket (Model MRB II) is available for the
Micro90x II and Micro80x II that provides greater
positioning flexibility. For more information,
contact your dealer or Boston Acoustics directly.
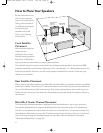
The speaker may be angled upward for
optimum coverage of the listening area.
Wall-Mounting Your Micro90x II and 80x II Satellites
The Micro90x II and Micro80x II satellites may be wall-mounted using the included keyhole bracket:
Troubleshooting
Subwoofer does not make sound
1. Check to ensure the subwoofer’s AC power cord is properly plugged in. If the outlet being used
is controlled by a switch, make sure the switch is on.
2. If the power cord is properly attached but the pilot light does not illuminate, the AC fuse may be
blown. If necessary, replace the fuse with a same-type fuse or consult a service technician.
Listening Levels and Power Handling
The power recommendation for the speaker assumes the amplifier is not overdriven, which, over a
long period, can damage even our rugged speakers. If you hear a harsh, gritty noise, turn down the
volume control. Prolonged or repeated operation with a distorted signal from the amplifier can
cause damage to the speakers, which is not covered by the warranty.
9000II_9500 manual rev2 7/16/01 3:42 PM Page 14