


6
Preparing for Installation
Map out the wiring paths from the speakers to the amplifier. We recommend 18-gauge wire for
runs up to 25 feet, and 16-gauge or thicker for longer runs. Be sure the speaker wire does not rest
or rub against any sharp or pointed objects.
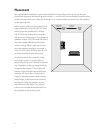
The speakers should be mounted on a flat surface to form a good seal between the speaker flange
and the mounting surface.
Each speaker is 8 ohms nominal. When connecting more than two speakers per amplifier channel,
you should use series/parallel wiring or line transformers. In all cases, make certain that the total
impedance does not fall below the amplifier’s minimum rating. If you are not sure, contact your
Boston Acoustics dealer.
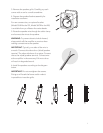
Use the cable clamp supplied to secure the speaker wire to the housing. Press the clamp into one
of the holes on the printed circuit board.
You Will Need
1. A utility knife, an electric jigsaw, or another means of cutting a hole in the mounting surface.
2. Phillips and flat-blade screwdrivers.
3. A wire cutter or stripper for preparing the speaker wires.
4. An awl or a small screwdriver to remove the speaker grille.
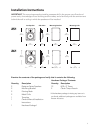
With the hardware supplied, the speaker can be installed in existing walls and ceilings from
3
⁄8" (9.5mm) to 1
1
⁄2" (38mm) thick. For thinner walls, you will need to use spacers (not provided)
for the mounting bracket. In walls greater than 1
1
⁄2" (38mm) thick, you will need longer screws.
Installation
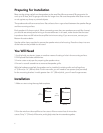
1. Make a cutout using the supplied template.
2. Run the wire from the amplifier to the cutout. Allow an extra foot of wire at the
cutout. Strip
1
⁄2" (12mm) off the wire, and tightly twist the wire strands together.
BostonAcoustics
251
HOLE CUTTING TEMPLATE
Cut hole to exact size of template. For details, see page 6 of installation instructions.
BostonAcoustics
261
HOLE CUTTING TEMPLATE
Cut hole to exact size of template. For details, see page 6 of installation instructions.
8
3
⁄4"
(223mm)
5
3
⁄4"
(146mm)
7
1
⁄8"
(181mm)
9
7
⁄8"
(251mm)