


XCH10RF
15
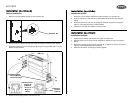
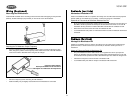
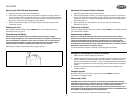
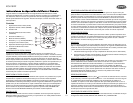
Mounting the Wired Remote Commander
1. Determine where the remote control will be located.
2. Use isopropyl (rubbing) alcohol and a paper towel to prepare the mounting surface. Do
not use any other solvent (paint thinner, acetone etc.) as these could damage the interior
finish of the vehicle. The mounting surface must be free of dirt, lint, grease (Armor All) etc.
After cleaning, let the area dry thoroughly for a few minutes.
3. Remove the protective backing from the adhesive/Velcro strip and press the remote
control firmly in place.
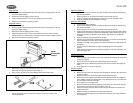
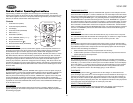
Resetting the Unit
After completing all connections, press the RESET button on the commander unit (see
“Resetting the Unit” on page 15).
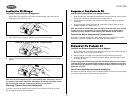
Reconnecting the Battery
NOTE: Check your vehicles owner's manual before disconnecting the battery.
Disconnecting the battery on some late model vehicles may require an anti-theft code
after the installation is complete. In some cases, the vehicle may run rough until the
engine management system can relearn its normal operating environment. Always
check with your local dealer or professional installer if you are uncertain.
When wiring is complete, reconnect the battery negative terminal.
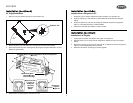
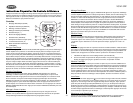
Montando el Comando Remoto Cableado
1. Determine dónde estará ubicado el control remoto.
2. Utilice alcohol isopropilo (de frotar) y una toalla de papel para preparar la superficie de
montaje. No utilice ningún otro solvente (aguarrás, acetona, etc.) porque pueden dañar el
interior de su vehículo. La superficie de montaje debe estar libre de suciedad, pelusas,
grasa (Armor All), etc.
3. Quite el protector de la cinta adhesiva o de velcro y presione el control remoto
firmemente en su lugar.
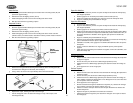
Reiniciando la Unidad
Luego de completar todas las conexiones, presione el botón RESET en la unidad de comando
(vea "Reiniciando la Unidad").
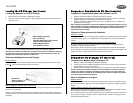
Reconectando la Batería
NOTA: Lea el manual de instrucción del vehículo antes de desconectar la batería.
Desconectando la batería en alguno los últimos vehículos modelo pueden requerir un
código antirrobo después de la instalación. En algunos casos, el vehículo puede
funcionar incorrectamente hasta que el sistema de gerencia del motor puede volver a
su ambiente de funcionamiento normal. Compruebe siempre con su instalador local del
distribuidor o del profesional si usted es incierto.
Cuando el cableado se complete, reconecte el terminal negativo de la batería.
Montage du Commandeur à Distance Connecté
1. Déterminer où le contrôle à distance va être situé.
2. Utilisez isopropyl alcool (pour frotter) et une serviette à papier pour préparer la surface du
montage. N'utilisez pas d'autres solutions (diluants de peinture, acetone) qui peuvent
nuire à la finition intérieur du véhicule. La surface à montage doit être libre de poussière,
de graisses et de peluches etc. Après nettoyage, laissez l'endroit sécher pour quelques
minutes.
3. Enlevez le dos protectif de la bande adhésive/Velcro et appuyez solidement sur le
contrôle à distance.
Reréglé l'appareil
Après avoir fini toutes les connexions, appuyez sur le bouton RESET sur l'unité du
commandeur (voir Rerégler l'unité).
Rebranchez la Pile
A NOTER: Lisez le manuel d'instruction de véhicule avant de débrancher la batterie.
Débranchant la batterie sur certains les véhicules modèles en retard peuvent exiger un
code anti-vol après installation. Dans certains cas, le véhicule peut fonctionner
inexactement jusqu'à ce que le système de gestion de moteur puisse retourner à son
environnement normal de fonctionnement. Vérifiez toujours avec votre installateur local
de revendeur ou de professionnel si vous êtes incertain.
Lorsque le câblage est terminé, rebranchez le terminal pile négatif.