128-6196A
11 of 16
1111
1111
11
the auxiliary input mode, the portable audio
device will now operate through the audio
system of the radio using the volume, tone
and balance controls of the radio for
adjustment of the sound.
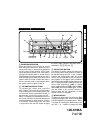
cp TIME/FREQUENCY SELECTOR (T/F)
This unit can display either the clock time or
radio frequency/CD player functions. Ordinarily,
the radio frequency or CD player track in-
dication is displayed, but the display can
also show the time when this button is
pressed. The time will then be displayed
for approximately 5 seconds after which it
will return to the radio or CD player function
display.
The correct time-of-day can also be set into
the unit by pressing the Time/Frequency
Selector button. This procedure is outlined
later in these operating instructions.
cq RESET BUTTON
A Reset button is located on the front panel of the
unit to the right of the LED display. The Reset
function is provided to protect the microproces-
sor circuitry and should only be activated under the
following circumstances as it will erase the time
and pre-set memories:
1. Upon initial installation after all wiring is
completed.
2.If there is a malfunction of any of the switches
on the unit, pressing the Reset button may
clear the system and return to normal opera-
tion.
If a problem should develop while operating the CD player, an error code (ER-1, ER-2, ER-3, etc.)
may appear on the display panel. This can indicate a number of problems with the unit, includ-
ing a mechanical error or an error in the microprocessor control of the player. If an error code
should appear, try ejecting and re-loading the disc into the player. While the disc is out of the unit,
make sure it is clean, undamaged, and loaded correctly (label surface up). You may also try
activating the RESET button
?G on the unit, but this will also erase the time memory.
If the suggested measures do not solve the problem, contact an approved warranty station near
you for further assistance.
CD PLCD PL
CD PLCD PL
CD PL
AA
AA
A
YER ERRYER ERR
YER ERRYER ERR
YER ERR
OR CODESOR CODES
OR CODESOR CODES
OR CODES
SETSET
SETSET
SET
TT
TT
T
ING THE CLOCKING THE CLOCK
ING THE CLOCKING THE CLOCK
ING THE CLOCK
1. Turn the vehicle ignition and radio on.
2. Press and hold the Time/Frequency button
cp for approximately 2 seconds; the time
display will begin to flash.
3. Within 5 seconds of selecting the flashing display, press the VOL + button to adjust the
hours and the AM/PM indication to the desired setting.
4. Press the VOL - button to adjust the minutes to the desired time.
4. Five seconds after the last hour or minute adjustment is made, the time will be set in the
unit and normal operation will resume.
OPEROPER
OPEROPER
OPER
AA
AA
A
TT
TT
T
ING INSTRUCING INSTRUC
ING INSTRUCING INSTRUC
ING INSTRUC
TT
TT
T
I0NSI0NS
I0NSI0NS
I0NS
ERROR CODE /ERROR CODE /
ERROR CODE /ERROR CODE /
ERROR CODE /


