


5
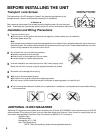
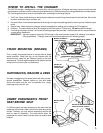
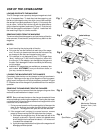
MOUNT ON FLOOR OF TRUNK
(HORIZONTAL OR 45 DEGREES)
MOUNT ON
SIDEWALL OF
CARGO AREA
MOUNT ON BULKHEAD BEHIND
SEAT OF PICKUP TRUCKS
MOUNT ON BACKWALL
OF HATCH AREA
MOUNT ON SIDE OF
TRUNK SIDEWALL
TRUNK MOUNTING (SEDANS)
This is usually the easiest location to use as there is ample
space available. Check that you do not interfere with the
removal of your spare tire, etc. Observe caution on fuel tank
stated above. The only negative aspect is the need to route the
wiring from the trunk to your car dashboard.
HATCHBACKS, WAGONS & VANS
A simple investigation of the areas shown will often provide
several possibilities. Observe caution on fuel tank stated
above and make sure the unit is protected from cargo,
passenger entry and exit, etc.
UNDER PASSENGER’S FRONT
SEAT/BEHIND SEAT
If sufficient space and easy access exist, the area under the
passenger's front seat is ideal, and will also allow easy wiring
access. However, you may need to temporarily remove the
seat for ease of installation. The area behind either the
passenger’s or driver’s seat on pickup trucks is another ideal
location.
MOUNT UNDER LIP OF TRUNK
MOUNT UNDER
SEAT
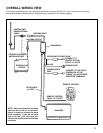
The ACC-52 changer is designed for horizontal (flat), vertical (upright) or 45-degree mounting. It must never be mounted
upside-down or on either one of it's sides as explained previously. A few of the many mounting possibilities are shown below.
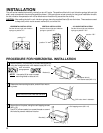
The following precautions must be considered when selecting the mounting location:
1. Fuel Tank - Never install above your fuel tank as the holes you must drill may pierce the tank or the fuel lines. Also check
for other obstructions such as wires, etc.
2. Excessive Heat - Avoid areas exposed to direct sunlight (on top of rear package shelf) or next to your car heater’s output
ducts.
3. Ease of Use - Make certain the changer is easily accessible for loading and unloading the CD magazine.
4. Distance - The data cable that joins the changer to the FM module is 15 feet long. Do not exceed this length.
5. If mounting to a plastic surface, do not use the self-tapping screws provided. Use the bolts and hex nuts provided for
a more secure installation.
IMPORTANT: Failure to properly secure the CD changer is the most common cause of all “skipping” and related
CD play problems. Changer must be mounted as explained on the following pages.
WHERE TO INSTALL THE CHANGER