


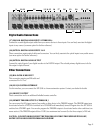


Rear Panel Connections
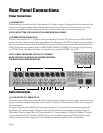
Power Connections
(1) POWER INLET
Before making any connections, check that the mains (AC) voltage or range of voltages printed on the rear panel is the
same as your local mains supply voltage. Plug the female (socket) end of the power cord into the power inlet on the
rear of the preamplifier. Plug the male (plug) end of the cord into a wall socket or an extension power cord.
NOTE: CONNECT THE ATP 8500 ONLY TO A GROUNDED WALL SOCKET.
(2) POWER SWITCH (REAR PANEL)
Press the rocker switch to the “I” position to turn the preamplifier ON and the “O” position to turn it OFF. In the OFF
position, all power is disconnected from the preamplifier. In the OFF position, the ATP 8500 cannot be powered up from
the front panel or the remote control. In the ON position (provided the device receives power from the wall outlet) the
ATP 8500 will power up in standby mode (see FRONT PANEL CONTROLS, STANDBY). If you are not going to be using
the ATP 8500 for an extended period of time, you should turn the rear panel "POWER" switch OFF.
NOTE: ALWAYS SWITCH THE ATP 5800 TO “STANDBY”
MODE (FRONT PANEL SWITCH OFF) BEFORE SWITCHING
THE REAR PANEL POWER SWITCH OFF.
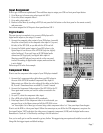
Audio Connections
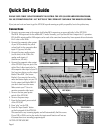
(3) ANALOG INPUTS 1 THROUGH 10
Connect the output cables of the analog audio devices to these sockets. Always connect these inputs, even when you are
going to listen only via digital inputs (such sources as DVD or CD players). This ensures that there is always a signal at
the record outputs.
The signal coming from the ANALOG audio inputs goes through an A/D converter that turns the analog signal into
digital form (A/D=Analog to Digital. The signal is now ready for Dolby Pro Logic decoding or post-processing with
Music Modes. Then the signal is fed to D/A converters and to 7.1 Channel outputs (D/A=Digital to Analog). The signal
you have selected is also fed to the three ANALOG outputs. Note: the balanced stereo input (XLR connectors) can be
routed via the menu system to bypass the A to D conversion and operate completely in the analog domain.
Page 8
3 4 5 6 2 17
83
8