


ASUS DSBV-DX Series 4-1
4.1 Managing and updating your BIOS
The following utilities allow you to manage and update the motherboard Basic
Input/Output System (BIOS) setup:
1.
Phoenix Phlash16 BIOS Flash Utility
(Updates the BIOS in DOS mode
using a bootable oppy disk.)
2.
ASUS CrashFree BIOS 2
(To recover the BIOS using a bootable oppy disk
when the BIOS le fails or gets corrupted.)
3.
ASUS Update
(Updates the BIOS in Windows
®
environment.)
Refer to the corresponding sections for details on these utilities.
Save a copy of the original motherboard BIOS le to a bootable oppy disk in
case you need to restore the BIOS in the future. Copy the original motherboard
BIOS using the ASUS Update or Phoenix Phlash16 BIOS utilities. Refer to page
4-3 for details.
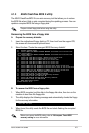
4.1.1 Creating a bootable oppy disk
1. Do either one of the following to create a bootable oppy disk.
DOS environment
a. Insert a 1.44MB oppy disk into the drive.
b. At the DOS prompt, type
format A:/S
then press <Enter>.
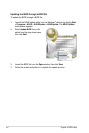
Windows
®
XP environment
a. Insert a 1.44 MB oppy disk to the oppy disk drive.
b. Click
Start
from the Windows
®
desktop, then select
My Computer
.
c. Select the
3 ½ Floppy Drive
icon.
d. Right click
File
from the menu, then select
Format
.
A Format 3½
Floppy Disk
window appears.
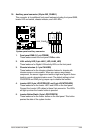
e. Select
Create an MS-DOS startup disk
from the format options eld,
then click
Start
.