


SET-UP
©American Audio® - www.americandj.com - PRO-DJ2FX™ Instruction Manual Page 6
CUSTOMER SERVICE
Customer Support: American Audio® provides a toll free customer support line, to provide set up help and to
answer any question should you encounter problems during your set up or initial operation. You may also visit us
on the web at www.americandj.com for any comments or suggestions. For service related issue please contact
American Audio
®. Service Hours are Monday through Friday 9:00 a.m. to 5:00 p.m. Pacifi c Standard Time.
Voice: (800) 322-6337
Fax: (323) 582-2610
E-mail: support@americandj.com
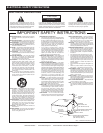
Warning! To prevent or reduce the risk of electrical shock or fi re, do not expose this unit to rain or moisture.
Caution! There are no user serviceable parts inside this unit. Do not attempt any repairs yourself, doing so will
void your manufactures warranty. In the unlikely event your unit may require service please contact customer
support. Please do not return to your dealer without fi rst contacting customer support.
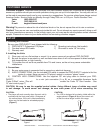
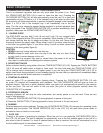
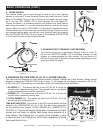
CAUTION:
• The player will work normally when the main unit is
mounted with the front panel within 15 degrees of
the vertical plane. If the unit is tilted excessively,
discs may not be loaded or unloaded properly.
(Figure 1)
CAUTION:
• The LCD is designed to be clearly visible within the
angles shown in Figure 2. Mount the control unit
so that the visual angle is within this range.
Figure 2
50˚10˚
Figure 1
15˚
1. Checking the Contents:
Be sure your PRO-DJ2FX™ was shipped with the following:
1) PRO-DJ2FX™ Professional CD player. 1) Operating instructions (this booklet).
1) One dual stereo RCA cable. 1) One male to male 1/8” mini plug.
1) Warranty card.
2. Installing the Units
1) Place your unit on a flat surface or mount it in a secure case such as optional PRO-DJ/CASE.
2) Be sure the player is mounted in a well ventilated area where it will not be exposed to direct sunlight,
high temperatures, or high humidity.
3) Try to place the unit as far as possible from TVs and tuners, as the unit may cause undesirable
interference.
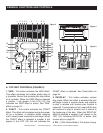
3. Connections
1) Be sure main power is connected last to prevent any electrical damage.
2) AUDIO CONNECTIONS: Use the included RCA cable to connect the PRO-DJ2FX™ outputs to the line
inputs of a mixer. Never connect a CD player's output to a mixers "phono" inputs.
3) CONTROL JACK CONNECTIONS: Use the supplied 1/8” mini plug cable to connect your PRO-
DJ2FX™ to a mini jack connection (A or B) on a compatible American Audio
“Fader Q Start” mixer. (This will enable the Fader “Q” Start function - See
“Q” start control page 7)
CAUTION: Be sure to use the supplied control cables. Using different types of cables may result
in unit damage. To avoid server unit damage, be sure main power is off when connecting the