


and off. This button will also change the pitch
percentage the
PITCH SLIDER (10) will react to.
The pitch percentage can be changed between
4%, 8%, 16% and 100%. 4% will allow the least
amount of pitch manipulation and 100% will
allow the most amount of pitch manipulation. To
adjust to the different values please see page
28. The L.E.D. of the PITCH ON/OFF BUTTON
will indicate which pitch percentage mode you
are in, glowing red for 4%, glowing red for 8%,
glowing blue for 16% or flashing blue for 100%.
Note when L.E.D. is not glowing in any color the
Pitch Function is not activated.
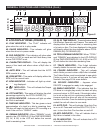
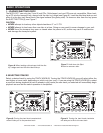
17. TAP BUTTON - This button is used to override
and manually set a tracks BPM. Occasionally the
built-in BPM meter may not function as desired.
This button allows you to override the internal
beat clock and manually set a tracks BPMs. To
manually set the BPMs; tap this button a few
times to a tracks heavy down beat, the unit will
automatically calculate your tapping and trans
-
late it into a tracks BPMs. The BPM READOUT
is then displayed in the LCD (2). To return to the
automatic BPM counter, press and hold down
the TAP BUTTON for at least 2 seconds and then
release.
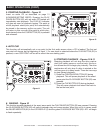
18. BOP BUTTON - During play mode, pressing
the BOP button will instantly return play to the
last set cue point without interruption of music.
19. RELOOP BUTTON - If a SEAMLESS LOOP
has been made (see setting a SEAMLESS LOOP
on page 17), but the CD Player is not actively in
SEAMLESS LOOP mode (a loop is not playing),
pressing the RELOOP BUTTON will instantly
reactivate the SEAMLESS LOOP mode. To exit
loop, press the OUT BUTTON (20)
. LOOP and
RELOOP will appear in the LCD DISPLAY (2)
when the RELOOP function is available.
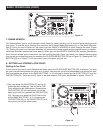
20. OUT BUTTON - This button is used to set
the ending point of a loop. A loop is started by
pressing the IN BUTTON (21),
pressing the OUT
BUTTON set the loop ending point. The loop
will continue to play until the OUT BUTTON
is
pressed once again.
21. IN BUTTON - “CUE ON THE FLY” - This
GENERAL FUNCTIONS AND CONTROLS (Cont.)
function allows you to set a CUE POINT (see CUE
POINT page 18) without music interruption (“on
the fly”). This button also sets the starting point
of a seamless loop (see SEAMLESS LOOP).
22. PLAY/PAUSE BUTTON - Each press of the
PLAY/PAUSE BUTTON causes the operation to
change from play to pause or from pause to play.
While in play mode the blue play L.E.D. will glow,
and while in pause mode the blue play L.E.D. will
flash.
23. CUE - Pressing the CUE button during play-
back immediately pauses playback and returns
the track to the last set cue point (see setting a
CUE POINT, page 16). The green CUE L.E.D. will
glow when the unit is in cue mode The L.E.D. will
also flash every time a new CUE POINT is set.
The CUE button can be held down to momen
-
tarily play the CD. When you release the CUE
button it instantly returns to the CUE POINT. You
can also tap the CUE button to create a BOP
EFFECT (for definition of BOP EFFECT, see page
24).
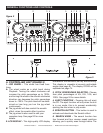
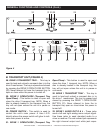
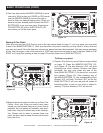
B. REMOTE CONTROL - REAR
24. CHANNEL 1 REMOTE JACK - Connect the
supplied 8 pin din cable from this jack to the
player's channel 1 remote connector. This will
allow you to control the functions of player 1.
25. CHANNEL 1 CONTROLLER JACK - Connect
the supplied mini-plug from the CUE jack on the
rear of your CD unit to the CONTROL out jack of
a compatible American Audio
® or American DJ®
mixer. This will enable the CD "Q-Start" function.
This feature is only available on American Audio
®
or American DJ
® “Q” series mixers.
26. CHANNEL 2 REMOTE JACK - Connect the
supplied 8 pin din cable from this jack to the
player's channel 1 remote connector. This will
allow you to control the functions of player 2.
27. CHANNEL 2 CONTROLLER JACK - Connect
the supplied mini-plug from the CUE jack on the
rear of your CD unit to the CONTROL out jack of
a compatible American Audio
® or American DJ®
mixer. This will enable the CD "Q-Start" function.
This feature is only available on American Audio
®
or American DJ
® “Q” series mixers.
©American Audio® - www.americanaudio.us - MCD-810™ Instruction Manual Page 11