


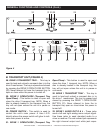

more you turn the wheel in either direction, the
faster your search.
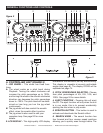
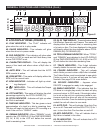
7. BANK BUTTONS 1-4 - These button are used
to store either four (4) cue points or four (4) loops.
Each Bank Button can store either a loop or a
cue point. 5 sec. loops can be stored in each
bank.
8. TRACK KNOB - This knob is used to scroll
backward and forward through tracks. Pushing
this knob and turning it at the same time will let
you scroll through the folders found on a Mp3
disc. Also, when you press it once it will toggle
between the track name and the album name on
an Mp3 disc.
9. FOLDER BUTTON - This button is used to
toggle between fo
lders and tracks. Press this
button to show the folder that is playing in the
LCD. This button is really only for Mp3 discs.
10. PITCH SLIDER - This slider is used to adjust
the playback pitch percentage. The slider is a
set adjustment and will remain set until the pitch
slider is moved or the pitch function has been
turned off. This adjustment can be made with
or without a disc in the drive. The pitch adjust
-
ment will remain even if a disc has been remove
and will reflect on any other disc loaded into the
player. That is to say, if you set a +2% pitch on
one disc, remove that disc and insert another,
that disc too will have a +2% pitch. The amount
of pitch being applied will be displayed in the
LCD (2).
11. TEMPO LOCK FUNCTION - This button
activates the TEMPO LOCK function. This func
-
tion allows you to use the PITCH SLIDER to
speed up or slow down playback speed without
altering the tonal pitch of the track. When this
function is not engaged the original tonal pitch
of the track will be altered giving you the "chip
-
munk" effect when a track is played at a high rate
of speed, or the "James Earl Jones" effect when
a track is slowed to much. To turn this function
off, press and hold down this button for at least
1 second and then release.
12. MEMORY BUTTON - This button allows
you to program up to 4 cue points or four loops
in to the four BANK BUTTONS (7). The loops or
cue point can then be recalled at any time even
when the disc has been removed and reloaded
at a later time.
13. SGL/CTN - This function allows you to
choose between single track play or continuous
track play (all tracks in order). This function also
operates in FLIP FLOP mode. This button will
also allow you to turn the Auto Cue function on
and off. See page 14 for this function.
14. TIME MODE - The TIME button will switch the
time value described in the TIME METER
between
ELAPSED PLAYING TIME, TRACK
REMAINING
TIME, and TOTAL REMAINING TIME. This button
will a
lso allow you to enter the firmware, sleep
mode, and Memory clear menus. See page 22
for this menu fu
nction.
15. PITCH BEND BUTTONS -
(-) PITCH BEND BUTTON - The (-) pitch bend
function creates a momentary “Slow Down” in
the CD’s BPM’s (Beats per minute) while it is
playing. This will allow you to match the beats
between two playing CD’s or other playing music
source. Remember, this is a momentary function.
When you remove your finger from the pitch but
-
ton, the BPM’s will automatically return to
PITCH
SLIDERS (10)
pitch value Holding down this but-
ton will give a maximum of -100% pitch. Use
this function to slow to another playing music
source. Be sure to notice that this function is a
momentary pitch adjustment, for a more precise
adjustment use the
PITCH SLIDER (10) to match
the BPM’s with another playing music source.
(+) PITCH BEND BUTTON - The (+) pitch
bend function creates a momentary “BUMP” in
the CD’s BPM’s (Beats per minute) while it is
playing. This will allow you to match the beats
between two playing CD’s or any other music
source. Remember, this is a momentary function.
When you remove your finger from this button,
the BPM’s will automatically return to PITCH
SLIDERS (10) selected pitch. Holding down this
button will give a maximum of +100% pitch.
16. PITCH ON/OFF BUTTON - This button is
used to turn the PITCH SLIDER (10)
function on
GENERAL FUNCTIONS AND CONTROLS (Cont.)
©American Audio® - www.americanaudio.us - MCD-810™ Instruction Manual Page 10