30-EN
Connecting an Optical Digital Compatible Audio
Processor and an Ai-NET Non-Compatible DVD Player
H510 / OTHER (Initial setting)
After setting D-AUX to ON in “Setting the External Digital Input,” do
the following according to the audio processor type:
H510 : If a PXA-H510 and a DVD player (DVE-5207) not
compatible with Ai-NET are connected (using an
optical cable), use the H510 setting. Connect the
DVD player to the optical digital input (DVD Player)
terminal of the processor.
OTHER : If an audio processor other than a PXA-H510 and a
DVD player (DVE-5207) not compatible with Ai-NET
are connected (using an optical cable), use the
OTHER setting. Connect the DVD player to the
optical digital input (Head unit) terminal of the
processor.
• After input selection is completed, turn the ignition off and back on
again. Setting of the optical digital input switch is completed.
Display Setting
The display is selected on the setup main menu in step 3.
Dimmer Control
DIMMER AUTO (Initial setting) / DIMMER MANUAL
Set the DIMMER control to AUTO to decrease the illumination
brightness of the unit with the head lights of the vehicle ON.This
mode is useful if you feel the unit's backlighting is too bright at night.
Setting the Display Dimmer
CDA-9855:DIMMER Level1 (initial setting) / Level2 / Level3
CDA-9853:DIMMER LEV1 (initial setting) / 2 / 3
In the display Dimmer AUTO setting, three levels are available, the
highest level (LEVEL 3) being the dimmest when the car headlights
are on.
Scroll Type Setting
TYPE1 / TYPE2 (Initial setting)
Two types of scroll can be selected.
You can select the scroll type you like.
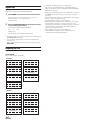
TYPE1 : The characters scroll right to left, appearing
from the right side of the display, one character
at a time.
TYPE2 : The display will show complete words, unless
they do not fit in the display at one time. Words
hyphenated when necessary and are shown
sequentially until the full title has been
displayed.
Scroll Setting
AUTO / MANUAL (Initial setting)
This CD player can scroll the disc and track names recorded on CD-
TEXT discs, as well as the text information of MP3/WMA files,
folder names, and tags.
AUTO : The CD text information, the text information of
folder and file names, and the tags are scrolled
automatically.
MANUAL : The display is scrolled when a disc is loaded or
when a track is changed, etc.
• The unit scrolls CD text names, folder names, file names or tag
display. The disc titles input manually (page 24) cannot be
scrolled.
Adjusting Display Contrast (CDA-9853 only)
CONTRAST
You can adjust the display contrast for better visibility.
You can adjust in a range of - 6 and + 6.
• The initial setting at the factory is “0.”
Switching the Character Font (CDA-9855 only)
TYPE1 (Initial setting) / TYPE2
Two types of font can be selected.
You can select the font type you like.
Setting the Temperature Display for the External Amplifier
CDA-9855:A-LINK F (Initial setting) / A-LINK C
CDA-9853:AMP TEMP °F (Initial setting)/ AMP TEMP °C
When a separately sold Amplifier Link compatible amplifier is
connected, you can set how to display its temperature. You can switch
the setting between Fahrenheit and Celsius.
°F : The temperature is displayed in Fahrenheit.
°C : The temperature is displayed in Celsius.
Setting the Display of the Audio Level Indicator (CDA-9853 only)
AUDIO LV ON (initial setting) / AUDIO LV OFF
You can set whether the audio level indicator is displayed.
Switching the Animation Display Type (CDA-9855 only)
TYPE1 (initial setting) / TYPE2 / TYPE3 / OFF
When the animation display is set in “Displaying the Title/Text” (page
22), you can select your favorite animation display from 3 types.
Opening Message ON/OFF Setting (CDA-9855 only)
OPENING MSG ON / OPENING MSG OFF (Initial setting)
You can select whether the opening display is shown or not when
power is turned ON. Choose between the standard display pattern and
the downloaded Profile data display pattern.
This function is only available if you have already downloaded the
profile data.
OFF mode:This shows the standard display pattern.
ON mode: This shows the downloaded Profile data and the
calendar message after data downloading.
Setting of Calendar Display Pattern Switching (CDA-9855 only)
dd/mm/yyyy(Initial setting) / yyyy/mm/dd
You can switch the calendar display pattern to be shown when the
time is displayed.
yyyy : shows the year
mm : shows the month
dd : shows the day
ex. dd/mm/yyyy → 25/12/2004
Demo Setting
Demo is selected on the setup main menu in step 3.
Demonstration
DEMO ON / DEMO OFF (Initial setting)
This unit has a Demonstration feature for the display and sound.
• To quit Demo mode, set to DEMO OFF.


