


1.1 Controls
Important:
1.2 Microphones
(optional)
2.1 Selecting the
Carrier Frequency
You can use the PT 81 bodypack transmitter with both dynamic microphones and
condenser microphones operating on a supply voltage of approx. 7 V.
The PT 81 operates in a subband up to 3 MHz wide of the 710 MHz to 869 MHz
UHF carrier frequency range. The PT 81 can be switched to a maximum of 15 dif-
ferent carrier frequencies depending on local frequency allocations.
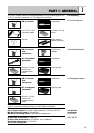
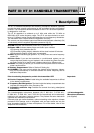
3a POWER: Switches the transmitter power ON ("I") and OFF ("0").
3b MIC: Mutes the audio signal (position "0") while power and carrier frequency
remain ON.
3c Status LED: Indicates battery status and audio input overload.
LED glowing dimly: batteries are OK.
LED constantly lighting brightly: batteries will be dead in about 60 minutes.
LED illuminating brightly: audio input is overloaded.
3d Audio Input: 3-pin mini XLR connector with both mic and line level pins that
automatically match the connector pinout of the recommended microphones
(see Part IV, section 1.2).
3e Color Code: If you use the transmitter within a multichannel system, you may
remove the black plastic platelet and replace it with a colored platelet includ-
ed in the optional Color Coding Kit to identify each channel by a different
color.
3f CHANNEL: This rotary switch selects the desired carrier frequency.
Prior to selecting frequencies, switch the transmitter OFF.
3g Belt Clip for fixing the transmitter to your belt.
3h Battery Compartment: Refer to Section 2 Setting Up.
3i Antenna: Permanently connected, flexible antenna.
3j GAIN: This rotary pot allows you to match the microphone or instrument level
to the transmitter’s audio section.
3k Carrier Frequency Table: A label listing the available frequencies is affixed
to the transmitter rear panel.
3l Frequency Set Designation: The label on the rear panel also indicates the
designation of the Frequency Set.
3m
Security Cover: Protects the POWER and MIC switches from being actuated
unintentionally.
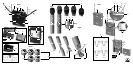
The following AKG microphones have been designed specifically for direct
connection to the audio input of the PT 81:
C 417 L
C 420 L
C 444 L
CK 77 L
1. Open the battery compartment (3h).
All controls are now accessible.
2. Use the supplied screwdriver (1m) to set the CHANNEL control (3f) to the de-
sired channel.
3. Set the CHANNEL control (1k) on the receiver to the same channel as the
transmitter.
27
PART IV: PT 81 BODYPACK TRANSMITTER
IV
1 Description
2 Setting Up