


4 Operating Notes
4.3 Discharging Rechargeable
Batteries
4.4 Replacing Batteries
Refer to fig. 10.
4.5 Setting Up the System
*) Refer to section 4.6.
4.6 Digital Input
If you connected a DVD player:
If you connected a CD player:
4.7 Playback Modes
In order to maintain full battery capacity for as long as possible, discharge the batteries completely about
once a month:
1. Switch the headphones on and leave them on the shelf until the Status LED (2) extinguishes.
2. Recharge the batteries.
The capacity of any rechargeable battery will decrease over time. If you feel that you need to recharge
the supplied batteries more often than would be convenient, you may consider replacing the batteries
with new AAA size 1.2 V rechargeable or 1.5 V alkaline dry batteries.
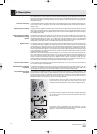
1. Rotate the ear pad on the left-hand earphone approximately 10° CCW to unlock the bayonet mount
and remove the ear pad.
2. Remove the dead rechargeable or dry batteries.
3. Insert the new batteries aligning them with the polarity symbols inside the battery compartments (3)
in the earphone.
4. Replace the ear pad on the earphone and rotate the ear pad approximately 10° CW to the point that
you can feel it has locked.
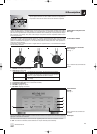
1. Remove the headphones from the transmitter.
2. Switch ON the audio source to which your transmitter is connected.
3. Press the ON switch (8) to switch the transmitter on.
The ON switch (8) will illuminate green.
The MODE and FREQ settings will be the same as those you have selected before switching the trans-
mitter off. (As delivered, the transmitter is set to STEREO mode and FREQ 1.)
The label backlighting will come on every time you switch the transmitter on even if you switched the
backlighting off before.
4. Depending on whether you connected the transmitter to an analog or digital*) audio source, use the
FREQ/INPUT key (10) to activate the AUDIO IN L/R analog input (16) (the DIGITAL label will remain
dark) or the digital input (15) (the DIGITAL label will be lit).
Press and hold FREQ/INPUT (10) until the DIGITAL label is lit or goes out, respectively.
If there is audio signal present at the transmitter input, the LEVEL label will flicker in step with the sig-
nal.
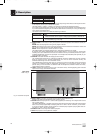
5. Use the OFF/ON switch (1) to switch the headphones on. The status LED (2) will be lit green.
6. Set the frequency selector (5) on the headphones and the FREQ selector (10) on the transmitter to the
same channel: FREQ 1 - 1, FREQ 2 - 2, or FREQ 3 - 3.
If you hear noise or beep sounds on the headphones, set both the FREQ selector (10) on the trans-
mitter and the frequency selector (5) on the headphones to a different channel.
7. Set the VOLUME control (6) on the headphones to the desired volume level.
Beep sounds audible in the headphones mean that the received signal is too weak, the headphones
receive no signal, or that the headphones are tuned to a different frequency than the transmitter. Move
closer to the transmitter or repeat step 6 above.
• To make sure your DVD player can communicate with the HEARO 888 DIGITAL via the digital con-
nection, set the digital output on your DVD player to "PCM", "D-PCM", or "Dolby Digital PCM" and
deactivate all surround effects on the DVD player. (The surround effects of the DVD player may
degrade the surround sound on the headphones.) Refer to the user manual of your DVD player.
• If the coaxial digital output on your DVD player is set to another format (Dolby Digital/AC-3, DTS, etc.),
the DIGITAL label on the HEARO 888 DIGITAL will flash twice and the transmitter will automatically
switch to the analog input. As soon as a valid PCM signal is present at the digital input (15), the trans-
mitter will automatically activate the digital input (15).
• The HEARO 888 DIGITAL can process the digital output signals of any CD player with a coaxial digi-
tal output, so there is no need to make any specific adjustment.
If communication between the two units fails nevertheless, refer to the user manual of your CD play-
er or contact the manufacturer.
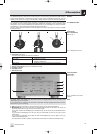
As delivered, the transmitter is set to STEREO mode.
Press the MODE key (9) to step though the playback modes of your headphone system:
18
HEARO 888 DIGITAL
(If the batteries are completely discharged, the
two indicators will come on with a delay of
approximately 30 seconds!)
The batteries will be fully charged after approxi-
mately 2 hours and the charger will switch to
trickle charging mode. (The CHARGE label (12)
on the transmitter will extinguish and the status
LED (2) on the headphones will continue shining
red.)
4. Remove the headphones from the transmitter to
stop the charging. (The CHARGE label (12) on
the transmitter and the status LED (2) on the
headphones will extinguish.)
If you forget to remove the headphones, do not
panic. You can leave the headphones on the
transmitter for as long as you like without risking
to overcharge the batteries.
The batteries will be fully charged after approxi-
mately 2 hours. (The status LED (2) on the head-
phones will continue shining red.)
4. Disconnect the charging cable from the charg-
ing jack (3) on the headphones to stop the
charging.
The status LED (2) on the headphones will extin-
guish.
If you forget to disconnect the charging cable,
do not panic. You can leave the headphones
connected to the charger for as long as you like
without risking to overcharge the batteries.
6122_04_HEARO888_fsch 06.04.2004 11:05 Uhr Seite 18