


17
HEARO 888 DIGITAL
3 Audio and Power Connections
3.1 Connecting to Audio
Sources
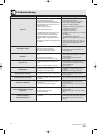
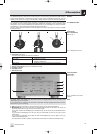
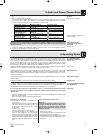
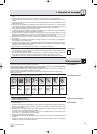
Refer to fg. 4 and Table 1.
Table 1: Audio connections and
required cables
3.2 Connecting the
Transmitter to AC Power
Important!
Refer to fig. 5.
4.1 Important Notes
Placing the transmitter:
Refer to fig. 6.
Refer to fig. 7.
Switching noise:
High volume levels:
Interference:
4.1 Charging Batteries inside
the Headphones
Important!
1. Before connecting the HEARO 888 DIGITAL to your audio source, switch power to your audio source
OFF.
2. Make the desired audio connections.
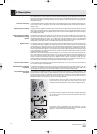
You can connect the HEARO 888 DIGITAL to any analog headphones output (mini jack or 1/4" jack),
to the LINE or REC output of your amplifier, or to an optical or coaxial digital output. To connect the
transmitter to a coaxial output, use the supplied DK 2 coaxial cable.
Check that the AC voltage stated on the supplied AC adapter is identical to the AC voltage avail-
able where you will use your system. Using the AC adapter with a different AC voltage may cause
damage to the unit.
1. Connect the cable on the supplied AC adapter to the DC 9 V jack (17) on the transmitter rear panel.
2. Connect the AC adapter to a convenient AC outlet.
Your HEARO 888 DIGITAL is a radio frequency device that conforms to the strict European and FCC stan-
dards. For physical reasons that are not related to the quality of the product, extremely strong interfer-
ence sources may affect reception. In order to maintain interference-free listening pleasure, do not oper-
ate your HEARO 888 DIGITAL in the close vicinity of radio equipment, cellular telephones, or directly
above TV or computer monitor picture tubes. The supplied connecting cables are long enough to allow
the transmitter to be placed at a safe distance from interference sources.
Reflections off metal surfaces may reduce the range of your transmitter. Therefore, be sure to place the
transmitter at least 8 inches (20 cm) away from any kind of metal surface.
Operating switches on or connecting the transmitter to your audio source may cause clicks which at high
volume settings may affect your hearing. Therefore, be sure to set the VOLUME control on the head-
phones to minimum before switching between different sources (tuner, turntable, CD player, etc.) or con-
necting the transmitter.
Listening over headphones at high volume levels, particularly over extended periods of time, may dam-
age your hearing.
Interference caused by other users of the same LPD band is beyond AKG’s control.
In order to ensure the longest possible service life for the rechargeable batteries, we deliver them
uncharged. Therefore, charge the supplied batteries before first operating your headphones system.
The supplied batteries have been inserted into the headphones for your convenience.
If you operate the headphones on dry batteries, never try to recharge these batteries. This would
cause serious damage to your headphones. Dispose of dead batteries conforming to local waste
disposal rules.
1. Use the OFF/ON switch (1) to switch the headphones off. (As long as the headphones are ON, the bat-
teries will not be charged.)
When the power is off, the Status LED (2) will be dark.
Analog audio source
Headphone output
Mini jack
1/4" jack
LINE OUT/REC OUT
2 x RCA jacks
Digital audio source
Coaxial output
HEARO 888 DIGITAL
AUDIO IN
L/R (2 x RCA jacks)
L/R (2 x RCA jacks)
AUDIO IN
L/R (2 x RCA jacks)
AUDIO IN
DIGITAL IN
Connecting cable
AK 2
AK 2 + stereo adapter
AK 1
DK 2 coaxial cable
supplied
4 Operating Notes
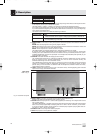
Charging on the transmitter:
2. Check that the transmitter is connected to a
power outlet.
Since the charging function operates independ-
ently of the rest of the transmitter circuitry, you
do not need to press the ON key (8) to charge
the batteries.
3. Refer to figs. 8, 1, and 2:
Place the headphones on the transmitter
The charging contacts on the transmitter and
those on the headphones will automatically
close the charging circuit and charging will start.
The status LED (2) on the headphones will start
flashing red and the CHARGE label (12) on the
transmitter will be lit constantly a few seconds
later.
Using the optional external charger:
Important:
Check that the AC voltage stated on the option-
al charger is identical to the AC voltage avail-
able where you will use your system. Using the
charger with a different AC voltage may cause
damage to the unit.
2. Refer to figs. 9 and 1:
Plug the charging cable on the charger into the
charging jack (3) on the headphones.
3. Plug the charger into a convenient power outlet.
The status LED (1a) on the headphones will illu-
minate red.
6122_04_HEARO888_fsch 06.04.2004 11:05 Uhr Seite 17