


AVR200
8
Setting up
Using the On Screen Display (OSD)
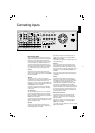
The easiest way to set up the AVR200’s multi-channel audio and
video options is through its On Screen Display (OSD).
To enter the OSD, ensure that you have a TV connected and
press any of the arrows on the remote control’s cursor pad.
To navigate from the fi rst (i.e. Setup) page, use the
•
and
•
arrows to highlight a line. To enter a highlighted page, press OK.
To leave the OSD, highlight ‘EXIT’ and press OK.
Once on a page, use the
•
and
•
arrows to move to a line
and the
•
and
•
arrows to change an option. Once you are
happy with the settings, highlight ‘SAVE AND EXIT’ and press OK
to keep them in memory. If you are unsure about the changes,
or you have entered the page accidentally, highlight ‘DO NOT
SAVE AND EXIT’ and press OK and any changes on that page
are ignored.
Setup page
The Setup page forms the index to the OSD. To navigate from
here, use the cursor pad on your remote control.
Input settings page
AUDIO Identifi es the active audio source (e.g. CD)
VIDEO Identifi es the active video source (e.g. DVD)
MODE Identifi es the surround mode associated with
the current input (Dolby Digital, DTS, Dolby
Pro Logic II Movie, Dolby Pro Logic II Music,
Dolby Pro Logic II Panorama, Dolby Pro Logic II
Matrix, Dolby Pro Logic, Hall effect or Stereo)
DYNAMIC RANGE
A compressed dynamic range is useful for low
level (night time) listening. For Dolby Digital
sources, the dynamic range has options of
100%, 75%, 50% or 25%
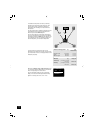
CENTRE WIDTH (Dolby Pro Logic II Music Mode only)
Allows centre-channel sounds to be positioned
between the centre speaker and the left/right
speakers over a range of eight steps. Step ‘3’
uses a combination of all three front speakers
to give the best vocal imaging and most
seamless soundstage and is recommended for
most recordings. Step ‘0’ places all centre
sound in the centre speaker. Step ‘7’ places all
centre sound equally in the left/right speakers,
as in conventional stereo.
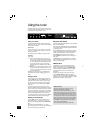
1 INPUT SETTINGS
2 CHANNEL BALANCE
3 CHANNEL DELAYS
4 SPEAKER SETTINGS
5 EXIT
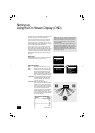
SETUP
1 INPUT SETTINGS
2 CHANNEL BALANCE
3 CHANNEL DELAYS
4 SPEAKER SETTINGS
5 EXIT
SETUP
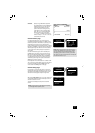
AUDIO = DVD
VIDEO = DVD
MODE = DOLBY DIGITAL
DYNAMIC RANGE = N/A
CENTRE WIDTH = 3
DIMENSION = 0
DO NOT SAVE AND EXIT
SAVE AND EXIT
INPUT SETTINGS
NOTE: In some cases you may fi nd that the OSD is not still
or that it ‘rolls over’ your screen. (You may also notice this
effect when the volume bar is shown on screen.) If this is
the case, you will need to switch the video system being
used by the AVR200.
To do this, fi rst exit the OSD by highlighting
EXIT and press
OK. Press and hold the STORE button on the front panel of
the AVR200 then toggle between the systems shown in the
display area by pressing the SAT button – NTSC (used in
North America) or PAL (used in most of Europe) – until the
correct system is selected.
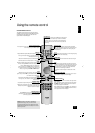
centre
front
left
front
right
20.8° 20.8°
28°
36°
54°
62°
69.8°
28°
36°
54°
62°
69.8°
Setting options for CENTRE WIDTH
DISPLAY EFFECT
Off No Centre spreading
1 20.8°
2 28°
3 36°
4 54°
5 62°
6 69.8°
7 Phantom Centre