


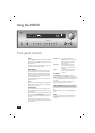


AVR100
5
English
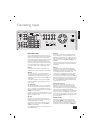
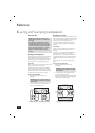
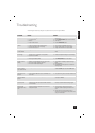
Connecting inputs
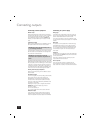
AC INLET
SURROUND
LR
+
–
CENTREFRONT
LR
+
–
OUT
VCR
IN
IN
DVD
IN
SAT
IN
AUX
OUT
(N.AM)10K
AM STEP
GROUND
LIFT
SPEAKER
IMPEDANCE
SELECTOR
4–6Ω 8Ω
GROUND
120V 230V
LOUDSPEAKER
OUTPUTS
SUB
WOOFER
CENTER
AUDIO VIDEO S-VIDEO
S-VIDEO
VIDEO
AUDIO
PRE-OUT
CD
TAPE 5.1 CH INPUT
SUB
WOOFER
CENTER
IN
IN
OUT
AUDIOR
(EU) 9K
L
LRLR
R L
FM
GND
AM
ANTENNA
MONITOR OUT
FRONT SURR FRONT SURR
DIGITAL
IN
VCR DVD SAT
Interconnect cables
The use of high quality interconnect cables to and from your
AVR100 is recommended to ensure the best sound and picture
quality. Ask your Arcam dealer’s advice on cable selection.
This product does not feature a Phono input stage. If you wish
to connect a turntable to your AVR100 you will need to use
an in-line phono pre-amp. All line level inputs have the same
sensitivity so may be used with any line level source equipment,
even components other than those labelled. If you need to do
so, your Arcam dealer can give you further advice on this.
CD input
Use audio interconnects to attach the left and right audio
outputs from your CD player to the CD inputs on the AVR100.
TAPE loop
This input can be used to connect one of many different
recording devices, for example, a tape deck, Mini-Disc or CD-R.
Use audio interconnects to attach the left and right audio
outputs from your recorder to the corresponding TAPE inputs
on the AVR100.
To complete the record loop, attach the left and right
TAPE
outputs from the AVR100 to the corresponding record inputs
on your recorder.
5.1 channel input
This multi-channel input takes up to six (i.e. fi ve channels plus
one sub-woofer) discrete channels of audio from a DVD audio
player or a DVD player with an integrated decoder. Use audio
interconnects to attach the DVD’s outputs to the appropriate 5.1
CH INPUT
inputs on the AVR100.
For optimum performance from DVD video, however, it is usually
better to use a digital connection to the AVR100’s own internal
digital surround decoder instead.
SAT input
Use audio interconnects to attach the left and right audio
outputs from your satellite or cable receiver (or digibox) to the
corresponding
SAT inputs on the AVR100.
Using either the composite or the S-video output from your
satellite receiver, connect it to the corresponding
VIDEO or
S-VIDEO input on the AVR100.
If your satellite receiver provides a coaxial digital output, attach
it via the
SAT digital input.
DVD input
In most cases you will achieve the best audio performance
from your DVD player by connecting its digital output to the
DVD digital input of the AVR100, using a suitable 75Ω digital
cable. Connect either the composite or S-video output from your
DVD player to the corresponding VIDEO or S-VIDEO inputs on
the AVR100.
If you are also using your DVD player to play CDs and prefer to
use the stereo audio outputs, connect these to the
CD inputs
of the AVR100.
VCR loop
Use audio interconnects to attach the left and right audio
outputs from your video cassette recorder to the VCR inputs
on the AVR100. For the video signal, use either the composite
or the S-video output from your VCR and attach to the
corresponding input on the AVR100. If the VCR has a digital
output, connect it to the VCR digital input on the AVR100.
To complete the record loop, attach the left and right
VCR audio
outputs from the AVR100 to the corresponding record inputs on
your VCR. Using the same type of video connection as for the
input, connect the VCR picture output from the AVR100 to the
corresponding input on your VCR.
AUX input and record loop
Use audio interconnects to attach the left and right audio
outputs from your auxiliary source (another item of audio
equipment or a games console) to the corresponding AUX
inputs on the AVR100. If your source produces composite video
output, connect this to the AUX composite video input.
If the auxiliary source is a recording device, complete the record
loop by attaching the left and right
AUX outputs to the record
inputs on your recording device. With a video recorder, connect
the composite video output (AUX) to the corresponding input on
your recording device.
GROUND LIFT switch
If your system only takes audio sources from CD or DVD,
set this switch to ‘GROUND’. In more complex setups which
involve satellite inputs or radio aerials, grounding the unit may
actually increase the level of background hum or buzz in the
loudspeakers, in which case set the switch to ‘GROUND LIFT’.