8
E
MOUNTING PRECAUTIONS
• Thisproductisforuseindoors.
• AmountingbracketcompliantwithVESAspecicationsis
required.
• Sincethemonitorisheavy,consultyourdealerbefore
installing, removing or moving the monitor.
• Mountingthemonitoronthewallrequiresspecialexpertise
andtheworkmustbeperformedbyanauthorizedSHARP
dealer. You should never attempt to perform any of this
work yourself. Our company will bear no responsibility
foraccidentsorinjuriescausedbyimpropermountingor
mishandling.
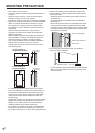
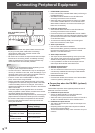
• Usethemonitorperpendiculartoalevelsurface.If
necessary,themonitormaybetiltedupto20degrees
upward or downward.
• Whenmountingthemonitorhorizontally,theoptionalfan
cover(PN-ZR31)isrequired.Fordetailsalongwiththe
horizontalmountingconditions,consultyourdealer.
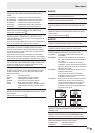
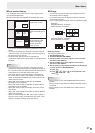
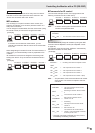
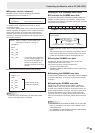
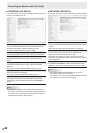
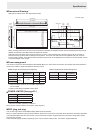
• Thismonitorshouldbeusedatanambienttemperature
between32°F(0°C)and104°F(40°C).Provide
enough space around the monitor to prevent heat from
accumulating inside.
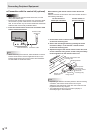
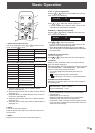
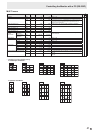
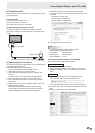
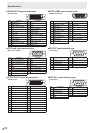
For the monitor in
landscape orientation
7-7/8 [20]
2 [5]
2
[5]
2
[5]
For the monitor in
portrait orientation
2 [5]
7-7/8
[20]
2
[5]
2
[5]
1-3/8 [3.5]
1-3/4 [4.5]
Unit: inch [cm]
Unit: inch [cm]
• Ifitisdifculttoprovidesufcientspaceforanyreason
such as the installation of the monitor inside a housing, or
if the ambient temperature may be outside of the range
of32°F(0°C)to104°F(40°C),installafanortakeother
measures to keep the ambient temperature within the
requiredrange.
• Temperatureconditionmaychangewhenusingthemonitor
togetherwiththeoptionalequipmentsrecommendedby
SHARP.Insuchcases,pleasecheckthetemperature
conditionspecifiedbytheoptionalequipments.
• Donotblockanyventilationopenings.Ifthetemperature
inside the monitor rises, this could lead to a malfunction.
• Donotplacethemonitoronadevicewhichgeneratesheat.
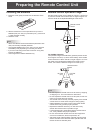
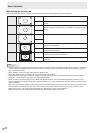
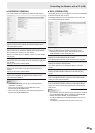
• Adheretothefollowingwheninstallingthemonitorinits
portraitorientation.Failingtoadheretothefollowingmay
cause malfunctions.
-InstallthemonitorsuchthatthepowerLEDislocatedon
the bottom side.
-SettheMONITORontheSETUPmenutoPORTRAIT.
(See page 23.)
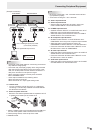
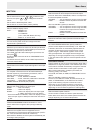
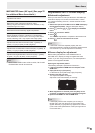
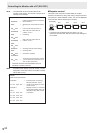
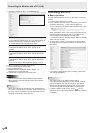
-Besuretosecurethepowercord(supplied)tothecable
clamp attachment with the supplied cable clamp. Make
sure that the power cord (supplied) does not supply power
to the terminal when being secured and do not over bend
the power cord (supplied).
Cableclamp
Power cord (Supplied)
Cableclampattachment
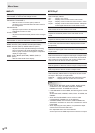
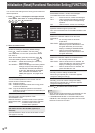
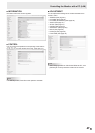
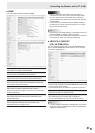
• Usethesuppliedverticalstickerwhenyouinstallthe
monitor in portrait orientation.
-Donotremovethefactory-afxedstickerbutafxthelogo
stickeroverit.Becarefulnottocovertheremotecontrol
sensor or buttons.