


En 23
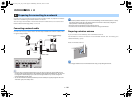
❑ Necessary setting
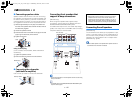
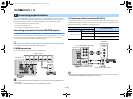
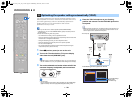
For example, if you have connected a video device to HDMI 2 and AV 6 (AUDIO) jack
(“AV 4” on RX-V479) of the unit, change the combination setting as follows.
1
After connecting external devices (such as a TV and playback
devices) and power cable of the unit, turn on the unit.
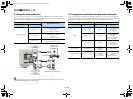
2
Press INPUT to select “HDMI 2” (video input jack to be used) as the
input source.
3
Press OPTION.
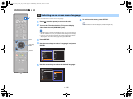
4
Use the cursor keys (q/w) to select “Audio In” and press ENTER.
5
Use the cursor keys (
e
/
r
) to select “
AV 6
” (“
AV 4
” on
RX-V479
) (audio
input jack to be used).
6
Press OPTION.
This completes the necessary settings.
If you select “HDMI 2” as the input source by pressing INPUT, the video/audio played
back on the video device will be output from the unit.
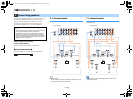
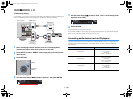
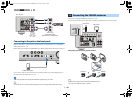
Connecting audio devices (such as
CD
players)
Connect audio devices such as CD players and MD players to the unit. Depending on
the audio output jacks available on your audio device, choose one of the following
connections.
AV 6
R
L
AUDIO
L
R
L
R
HDMI
HDMI
HDMI
HDMI 2 jack
(RX-V579)
AV 6 (AUDIO) jack
(RX-V479)
AV 4 (AUDIO) jack
Video device
Audio output
(analog stereo)
The unit (rear)
HDMI output
MUTE
TOP MENU HOME
POP UP/MENU
DISPLAYRETURN
SETUP
OPTION
ENTER
BLUETOOTH
MUTE
TO
P MENU
HOME
POP UP/MEN
U
DISPLA
Y
A
A
R
ET
UR
N
SETU
P
P
BLUE
T
O
OT
H
OPTION
Cursor keys
ENTER
Cursor keys
MUTE
ENHANCER
STEREO
TUNED
SLEEP
OUT
ECO
CHARGE
ADAPTIVE DRC
VIRTUAL
Audio In
VOL.
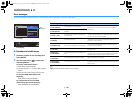
Audio output jacks on audio device Audio input jacks on the unit
Digital optical
(RX-V579)
AV 1 (OPTICAL)
(RX-V479)
AUDIO 1 (OPTICAL)
Digital coaxial
(RX-V579)
AV 2–3 (COAXIAL)
(RX-V479)
AUDIO 2 (COAXIAL)
AV 1 (COAXIAL)
Analog stereo
(RX-V579)
AV 4–6 (AUDIO)
(RX-V479)
AV 2–4 (AUDIO)
MUTE
ENHANCER
STEREO
TUNED
SLEEP
OUT
ECO
CHARGE
ADAPTIVE DRC
VIRTUAL
Audio••••••AV6
VOL.
1 2 3 4 5 6 7 8 9 10
05_setup.fm Page 23 Monday, March 30, 2015 9:54 AM