


Model PA4100X Page 9
© 2003 Xantech Corporation
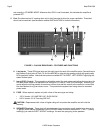
6. In multi-zone installations, you will have large bundles of wire and cable to accommodate audio, video and
speaker connections. Be sure to allow enough strain relief for the leads and dress them in such a manner so as
not to block airflow.
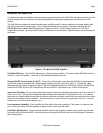
7. The PA4100X is designed for shelf mounting on flat horizontal surfaces. When mounting into a 19" rack, use an
appropriate rack kit.
NOTE: You should consider some sort of rear support for rack mounted units when used in mobile applications
or when located in seismically-active areas.
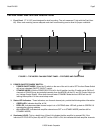
CONNECTING THE PA4100X
LEFT RIGHT
SPEAKER
+-- --+
LEFT RIGHT
A
DO NOT BRIDGE
1V
.2V
3V
LEVEL
7
STATUS
ZONE IR
K
E
Y
P
A
D
PREAMP OUT
RCA Type
Patch Cords
CI
1
PA435X
Rear Panel
+
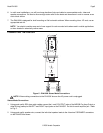
Be sure speakers are
connected with correct
polarity as shown.
Wall speakers,
shelf speakers, etc.
Left Right
+
LR
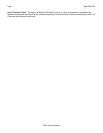
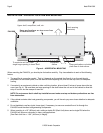
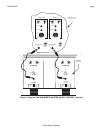
Figure 5 - PA4100X Stereo Mode Connections
NOTE: When making connections to the PA4100X be sure the AC power cord is unplugged.
Stereo Mode Connections
1. Using good quality RCA-type patch cables connect the L and R OUTPUT jacks of the MRC88 Pre Amp Output or
other driving preamp to the LEFT and RIGHT input jacks on the PA4100X. Do this for each amplifier pair. Refer
to Fig. 5.
2. Using good quality speaker wire, connect the individual speaker leads to the 4-terminal "SPEAKER" connectors
on the PA4100X as shown.