


Page 23
Page 23 of 30 DVR395/DVR396-002
SECTION 3
SETUP
3.1 GENERAL
This section provides procedures for initial setup of the unit.
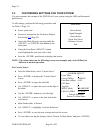
3.2 ON SCREEN DISPLAY (OSD)
The OSD information is contained in the video output from the receiver. It is turned on by
pressing either the <SELECT> or <ENTER> push-button on the front panel. The display is
removed by selecting Exit from the Main Menu. When a menu is first shown, the cursor is
always placed on its first action field (or action with edit field, which ever is first).
The OSD provides the following information and actions:
1. Carrier Status.
2. Signal Strength Monitoring.
3. Selecting the Perm Settings
4. Selecting the Serial Port device.
5. Software Version.
All menus are white text with a solid blue background with highlight as blue text on white
background. There are four field types: Action, Action w/ Edit, Edit, Edit w/ Choices. The
cursor can be moved only to these fields. The function of the <SELECT> and <ENTER> push-
button for each field type is described below.
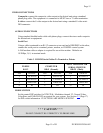
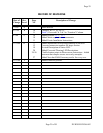
Table 7. SELECT And ENTER Key Functions
FIELD SELECT ENTER
Action Field Moves cursor to next action field
(or action w/ edit field, which
ever is next). Wraps at end.
Takes action on the current field.
Action w/ Edit Field Same as for action field. Moves cursor to corresponding
edit field.
Edit Field If cursor is not on last digit within
edit field, moves cursor to next
digit. Else, moves to next action
field (or action w/ edit field,
which ever is next)
Increments current digit within
edit field. Wraps back to
beginning at 9.
Edit Field w/ Choices Moves cursor to next action field
(or action w/ edit field, which
ever is next).
Scrolls through list of choices.
Wraps back to beginning on last.