


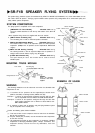

SR-F1B SPEAKER STAND
This speaker stand is manufactured by König&Meyer GmbH(K&M) of Germany for use with TOA's SR-F1B speaker.
The speaker stand consists of two main sections:
Sta nd: Model 213
Bracket: Model 19582
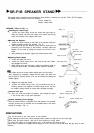
USAGE
(Refer
to
Fig.
1.)
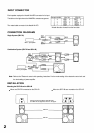
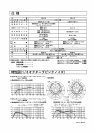
Extending the Stand Legs.
1 . Loosen the tripod clamp screw and extend the tripod legs by
sliding the clamp ring down the length of the stand until the leg
stays are horizontal, then retighten the screw.
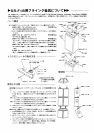
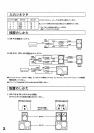
Mounting the Speaker.
2 . Attach the stand bracket to the base of the speaker using the
supplied mounting screws and washers. (Fig. 2).
3 . After ensuring that the bracket clamp screw is loose and not
protruding into the interior of the bracket, carefully place the
speaker on the stand by sliding the bracket over the end of the
stand.
4 . After positioning the speaker, tighten the bracket clamp screw.
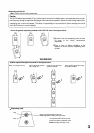
Adjusting Stand Height.
5 . Loosen the height lock screw.
6 . Loosen the handle clamp screw, then fold out the crank handle
and retighten the screw.
7 . While holding down the lock button, adjust the speaker's height by
turning the crank handle. (Clockwise rotation raises the speaker.)
The handle cannot be turned without holding down the lock button.
After adjustment is completed, release the lock button and make sure
that the shaft is securely locked. (This can be checked by rotating the
handle slightly.)
8 . Retighten the height lock screw.
9 . Loosen the handle clamp screw, flip the handle back into its
foldaway position and retighten the handle clamp screw. Be sure
the handle is always folded up except when adjusting the height.
Removal After Use
10. After use, lower and detach the speaker, then collapse the stand
in the reverse order of the above procedure.
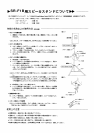
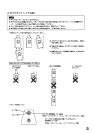
Speaker Mounting Screw Storage
After the stand bracket is detached from the speaker, the speaker
mounting screws can be inserted into the threaded holes of the stand
bracket for storage. (Fig. 3).
PRECAUTIONS
Only use the stand on flat, hard ground or floor surfaces.
Avoid installing the stand near narrow passages where passers by might trip over the tripod legs.
When using the stand outdoors, take care to avoid exposure to strong winds.
To reduce the chance of the stand toppling over, avoid extending the stand too high.
When there is potential for instability and the danger of a fall, be sure to secure the stand with guy wires or other
devices.
<Fig. 2>
<Fig. 1>
Speaker mounting screw
Plain washer
Threaded hole
<Fig. 3>
Plain washer-
Speaker mounting screw
Stand bracket
clamp screw
Height lock screw
Tripod clamp screw
Lock button
Handle clamp screw
Crank handle
Height adjuster
Tripod leg
Stay