


7
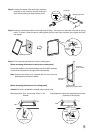
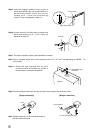
Step 8. Reinsert the detachable input connector into the unit's socket, then fit the unit in the mounting bracket.
Step 9. Rotate the lock tabs (4 places) until each contacts the fixing screw head left sticking out in Step 5.
Step 10. Retighten both the fixing screws (4 places) and lock tab screws (4 places).
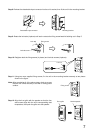
Step 11. Using two more supplied fixing screws, fix the unit to the mounting bracket securely at two places
shown in the figure.
Note: After completing all of the above steps, check to ensure
that the unit is fixed securely to the wall or ceiling panel
surface.
Step 12. Align the front grille with the speaker so that the four
stud screws align with the unit's corresponding stud
receptacles, then push the grille onto the speaker.
Detachable input connector
Mounting bracket
Fixing screwLock tab
Lock tab screw
Lock tab
Fixing screw
Front grille Stud receptacle