


4
6. INSTALLATION
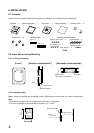
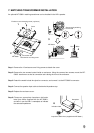
6.1. Contents
Check to be sure that the following components are available in a complete set before installation:
Speaker ..... 1
Stud holder ..... 4 Masking tape ..... 4
"Short"... 2
"Long"... 2
Cutout template ..... 1
Mounting screws/washers
Tapping screw (3x8) .... 4
Screw (M5x10) .... 4
Screw (M4x30) .... 6
Plain washer .... 4
Spring washer .... 4
Mounting bracket ..... 1 Front grille ..... 1 Anchor piece ..... 2
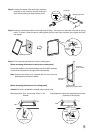
6.2. Flush Wall or Ceiling Mounting
6.2.1. Flush wall mounting
6.2.2. Installation order
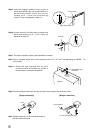
Step 1. Using the supplied cutout template, make a 360x480 mm mounting hole in the wall or ceiling panel.
Note
• There must be at least 103 mm of depth behind the wall or ceiling panel.
• The unit is mountable on the panel with thickness of 12 – 33 mm.
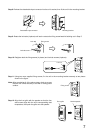
[Front ]
[Vertical cross-sectional ]
[Horizontal cross-sectional ]
HB-1
HB-1
Wall
Fixing screw
Mounting bracket
Frame lumber
(two-by-four construction)
Front grille
480 mm
360 mm
Mounting
hole
Mounting surface
Panel
12 – 33 mm
103 mm or more