10
English
AC INPUT: Correctly and firmly insert the supplied power cord into this jack. When removing
the cord, always grasp it at the connector. Never pull the cord itself. Do not bundle the power
cord together with the external FM antenna or any audio cables, as this can inject noise in the
audio path.
BASS PORTS: These ports produce low frequency output thereby enhancing the bass
response. Do not obstruct the ports, as this will not only diminish the sound quality but also
reduce internal heat ventilation.
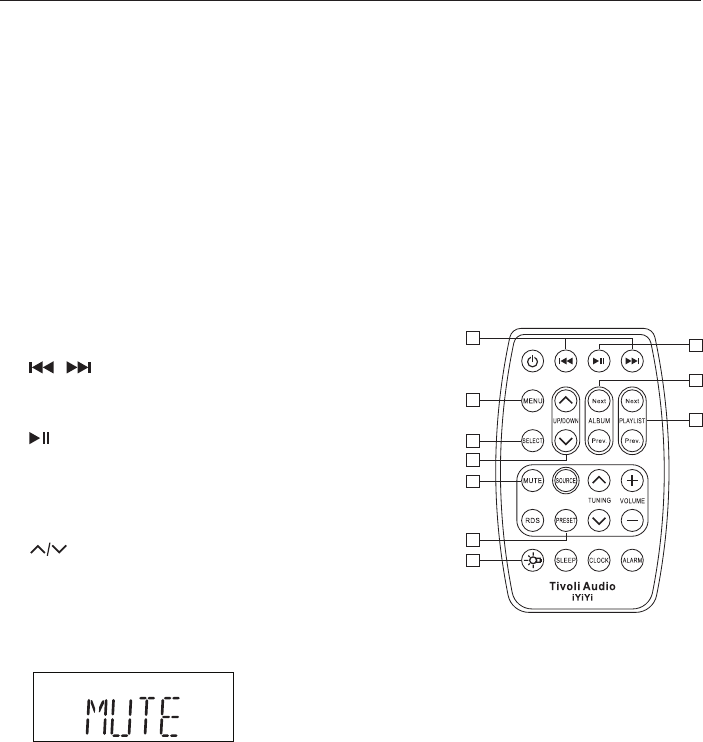
Remote Control (remove rear protective plastic from battery compartment):
Certain functions may not be compatible with older iPod software. To update your
software, log on to www.apple.com/ipod/download/
The front panel functions are repeated on the remote in addition to a Mute button.
The additional buttons pertain only to a docked iPod:
: Press briefly to advance or go back
a track. Press and hold to fast forward or fast
reverse through a track.
: Press briefly to play; press again to pause playback.
MENU: Press to enter the menu.
SELECT: Press to select the option highlighted
in the menu.
UP/DOWN: Navigate up and down within the menu.
ALBUM NEXT/PREVIOUS: Advance to the next
Album or go back.
PLAYLIST NEXT/PREVIOUS: Advance to the next Playlist or go back.
MUTE: Press to mute output. “MUTE” will flash on the LCD until audio is restored by
pressing Mute again or adjusting the volume (Fig. 10).
PRESET: Scrolls sequentially through the five FM and five AM preset radio stations.
(Cannot be used to store preset frequencies.)
BACKLIGHT: Press to temporarily activate the iPod’s backlight.
Note: the Clock and Alarm buttons on the remote only permit a brief display of the time and to
set the alarm to wake. These buttons do not allow setting the hour and minutes.
When it comes time to replace the remote’s battery, use only a major brand name 3V Lithium
battery compatible with model CR2025. Slide the battery cover off and install the new battery
with the positive “+” side facing up.
6.
7.
1.
2.
3.
4.
5.
6.
7.
8.
9.
10.
6
9
7
2
1
8
3
4
5
10
Figure 10


