


EN
1
Safety Information
Safety Information
Getting Started . . . . . . .2
Unpacking the system . . . . . . . .2
Back View . . . . . . . . . . . . . . . . . .2
Using the FM and AM
Antennas . . . . . . . . . . . . . . . . . .2
Connecting the Speakers . . . . .2
Installation . . . . . . . . . . . . . . . . .2
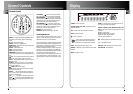
General Controls . . . . . .3
Main Unit . . . . . . . . . . . . . . . . . .3
Remote Control . . . . . . . . . . . .4
Display . . . . . . . . . . . . . .5
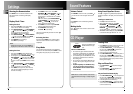
Settings . . . . . . . . . . . . .6
Showing the Demonstration . .6
Display Clock / Timer . . . . . . . . .6
Setting the Clock . . . . . . . . . .6
Setting the Timer . . . . . . . . .6
Activating the Timer . . . . . . .6
Adjusting the Display
Brightness . . . . . . . . . . . . . . . . . .6
Sleep Mode . . . . . . . . . . . . . .6
Sound Features . . . . . . .7
Volume Control . . . . . . . . . . . . .7
X-Bass . . . . . . . . . . . . . . . . . . . . .7
Muting Audio . . . . . . . . . . . . . .7
Using Preset Equalizer Curves .7
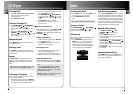
CD Player . . . . . . . . . . . .7
Notes on CD-R/RW Disc . . . . . . .7
Loading Discs . . . . . . . . . . . . . . .7
Play and Pause Discs . . . . . . . . .7
Selecting a Disc . . . . . . . . . . . . .8
Searching Through a CD . . . . . .8
Random Playback . . . . . . . . . . .8
Sampling Tracks . . . . . . . . . . . . .8
Repeat . . . . . . . . . . . . . . . . . . . . .8
Setting Up a CD Program . . . . .8
Playing a Program List . . . . .8
Display Program List . . . . . . .8
Edit Program List . . . . . . . . . .8
Deleting Program List . . . . . .8
Radio . . . . . . . . . . . . . . .9
Selecting Tuner Band . . . . . . . .9
Tuning to a Station . . . . . . . . . .9
Using Presets . . . . . . . . . . . . . . .9
Auto Preset Programming . . .9
Manually Setting Presets . . . . .9
Suppressing Stereo Signal . . . .9
Tuning to an RDS Station . . . .10
Searching by Program Type (PTY)
. . . . . . . . . . . . . . . . . . . . . . . . . .10
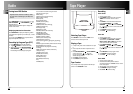
Tape Player . . . . . . . . .11
Selecting Tape Player . . . . . . .11
Playing a Tape . . . . . . . . . . . . .11
Tape Counter . . . . . . . . . . . . . .11
Recording . . . . . . . . . . . . . . . . .11
From Tuner . . . . . . . . . . . . .11
From CD . . . . . . . . . . . . . . . .11
From AUX . . . . . . . . . . . . . . .11
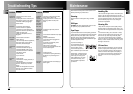
Troubleshooting Tips . .12
Maintenance . . . . . . . .13
Cleaning . . . . . . . . . . . . . . . . .13
CD Player . . . . . . . . . . . . . . . . .13
Tape Player . . . . . . . . . . . . . . . .13
Handling CDs . . . . . . . . . . . . . .13
Cleaning CDs . . . . . . . . . . . . . .13
CD Lens Care . . . . . . . . . . . . . .13
Important Information 14
Safety Precautions . . . . . . . . .14
Important Battery
Information . . . . . . . . . . . . . . .14
Headset Safety . . . . . . . . . . . . .14
Don’t Infringe . . . . . . . . . . . . .14
Technical Specification . . . . . .14
EN
Safety Information
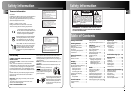
WARNING: TO PREVENT FIRE
OR ELECTRICAL
SHOCK HAZARD,
DO NOT EXPOSE THIS PRODUCT
TO RAIN OR MOISTURE.
SEE MARKING ON BOTTOM / BACK OF PRODUCT
CAUTION
RISK OF ELECTRIC SHOCK
DO NOT OPEN
THE EXCLAMATION
POINT WITHIN THE
TRIANGLE IS A
WARNING SIGN
ALERTING YOU OF
IMPORTANT
INSTRUCTIONS
ACCOMPANYING
THE PRODUCT.
THE LIGHTNING
FLASH AND ARROW-
HEAD WITHIN THE
TRIANGLE IS A
WARNING SIGN
ALERTING YOU OF
"DANGEROUS
VOLTAGE" INSIDE
THE PRODUCT.
CAUTION: TO REDUCE THE
RISK OF ELECTRIC SHOCK,
DO NOT REMOVE COVER
(OR BACK). NO USER-
SERVICEABLE PARTS IN-
SIDE. REFER SERVICING
TO QUALIFIED SERVICE
PERSONNEL.
Table of Contents
Thomson Information
CAUTION!
Invisible laser radiation when open. Avoid exposure to
beam. Class 1 laser product. This system must be
opened only by qualified technicians to prevent acci-
dents caused by the laser beam.
LASER λ = 780 nm, P max = 5 mW
Rating Information: At bottom/rear of the unit.
This unit comply with the existing requirements
In accordance with the rating plate of
the unit, this unit complies with current
standards concerning electrical safety
and electromagnetic compatibility.
Please respect the environment Before
throwing any batteries away, consult
your distributor who may be able to
take them back for specific recycling.
Have a Blast- Just Not in Your Eardrums
Make sure you turn down the volume
on the unit before you put on head-
phones. Increase the volume to the
desired level only after headphone are
in place.
ADVARSEL!
USYNLIG LASERSTRÅLNING VED ÅBNING NAR
SIKKERHEDSAFBR
YDERE ER UDE AF FUNKTION.
UNGDÅ UDSAETTELSE FOR STRÅLNING.
VORSICHT!
UNSICHTBARE LASERSTRALUNG
WENN ABDECKUNG GEÖFFNET UND SICHERHEITS–
VERRIEGELUNG ÜBERBRÜCKT.
NICHT DEM LASERSTRAHL AUSSETZEN!
CLASS 1 LASER PRODUCT
LASER KLASSE 1
APP
AREIL
A LASER
DE CLASSE 1
LUOKAN 1 LASERLAITE
KLASS 1 LASERAPPARAT
CAUTION – INVISIBLE LASER RADIATION
WHEN OPEN AND INTERLOCKS FAILED OR
DEFEATED. AVOID EXPOSURE TO BEAM.
ATTENTION –
RAYONNEMENT LASER INVISIBLE
DANGEREUX EN CAS D'OUVERTURE ET LORSQUE
LA SECURITE EST NEUTRALISEE.
EXPOSITION DANGEREUSE AU FAISCEAU.
VARNING–
OSYNLIG LASERSTRÅLNING NÄR DENNA DEL
ÄR ÖPPNAD OCH SPÄRRAN ÄR URKOPPLADE.
BETRAKTA EJ STRÅLEN.
VARO!
AV ATT AESSA JA SOUJALUKITUS OHITETT
AESSA
OLET AL
TTIINA NÄKYMÄTTÖMÄLLE.
LASERSÄTEILYLLE ÄLÄ KATSO SÄTEESEEN.
For UK Only
CONNECT THE MAIN LEAD INTO A MAINS
POWER SOCKET
POWER SUPPLY 230V. It must not be connected to
D.C. mains.
Note; The mains lead of the set is fitted with a
molded plug. If the mains socket are not compatible
or if for any reason the plug is removed please fol-
low the directions below. The molded plug cannot
be rewired and if removed must be disposed of safe-
ly.
DO NOT under any circumstances plug the severed
plug into any mains socket as this could result in
electric shock.
Important: If the plug is removed, rewire the new
plug as follow:
The wires in the mains plug are colored in accor-
dance to the following code:
BLUE = NEUTRAL/BROWN = LIVE
If the colors of the wires in the mains lead of this
apparatus may not correspond with the colored
markings identifying the terminals in your plug, pro-
ceed as follows:
BLUE wire to the terminal coded N (Neutral) or col-
ored black.
BROWN wire to the terminal coded L (Live) or col-
ored red.
DO NOT make any connection to
the terminal in the plug which is
marked by the letter E or by the
earth symbol or colored green or
green and yellow.
A fused plug must be fitted with
a 3A fuse approved by ASTA or
BS1362 and fuse covers must be
always be securely replaced. If
you set does not work, the fuse
may be blown.