


QUICK SET UP AND OPERATION
Synching Up The Transmitter and Base
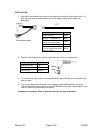
1) Turn the transmitter power switch to on and place the transmitter in the
recharge cradle of the base. The transmitter goes in the base with the
beltclip facing out.
2) The recharge LED will light (Green if fully charged, Red if charging) and the
In-Use Green LED on the base and transmitter will flash 3 times.
3) The transmitter and base are now synched and will continue to be until
another transmitter is linked to that base or the base is powered down.
Normal Operation
4) With the transmitter synched up, remove it from the cradle, plug in the lapel
microphone (if used) and place the transmitter on your belt.
5) To start the recording, press the In-Use button and the In-Use LED will light a
constant green and you will hear a short beep
6) To end recording, press the In-Use button and the In-Use LED will turn off
and you will hear a short beep.
7) At the end of your shift turn the transmitter off and replace it in the charging
cradle.
Out of Range
8) If you use the Transmitter too far away from the Receiver during recording,
the transmitter will alert you with Audible warning beeps (two tone) and the
In-Use LED will blink in red.
9) Move closer to the receiver base and the link will be re-established once you
return to normal range. The In-Use LED will light constant green when link is
back to normal operation.
10) If the link is not re-established within 30 seconds, the transmitter and receiver
will return to standby mode.
11) If you went out of range in Standby mode, or the unit reverted to standby
mode, re-enter normal range and press the In-Use button. Operation will
return to normal.
12) If you will be out of range for a long period of time, turn the bodypack off.
Low Battery Warning
13) If the transmitter Low BATT indicator (red) starts flashing or you hear warning
beeps, return the transmitter to its cradle on the receiver to fully charge the
transmitter.
14) The Charge LED indicator will light constant green when the unit is fully
charged.
EMG Panic Button (if wired for use in your vehicle)
15) The EMG or Panic Button can be programmed to do many things but may
not be connected in your vehicle. Check with your technical department to
understand what this button will control before you use it.
16) In Record mode: Press the EMG button on the transmitter, a beep will sound
and the relay will be triggered at the receiver.
17) In Standby mode: Press the EMG button on the transmitter, a beep will
sound, the green In-Use indicator will blink and the relay will be triggered at
the receiver.
Revision B Page 3 of 8 3/29/06