2-10 CSI-200 User Instructions
Key outputs – Expanded IFB Option
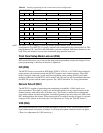
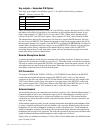
Four logic-type outputs are available at pins 6, 7, 19, and 20 of the auxiliary connector:
There are internal pull-up resistors on the CH 3 and CH 4 key outputs. Pressing the CH 3 or CH 4
talk button will result in a logic high to low transition at the corresponding key output. (Logic
high is approximately 13 VDC; Logic low is less than 2 VDC.) There are no internal pull-up
resistors on the CH 1 and CH 2 key outputs. These outputs will “float” until externally loaded.
The channel three and four key outputs may also be used to expand the IFB function, allowing
any one of several MCE325 User Stations to interrupt a single-point program source and talk on
the interrupted channel. For example, if one MCE325 is operating with PROGRAM A assigned to
channel three, the channel three key output of a second MCE325 User Station (with no program
connected) can be directly connected to the channel three key output of the first MCE325;
activating channel three for talk from either station will now interrupt the program source and
permit that station to talk on channel three.
Remote Microphone Switch
A remote microphone switch may be connected at the auxiliary connector. Connect mic switch
high to pin 25; connect mic switch low to pin 10 or 11. When the switch is closed, the microphone
will turn on, and the front panel MIC ON LED will illuminate. When the remote switch is off, the
microphone may be turned on from the front panel. When the remote switch is on however, the
microphone cannot be turned off from the front panel.
ISO Connection
To connect an RTS Model VCP6A, VCP12A, or VCP12B ISO Control Panel to the MCE325,
connect the unswitched microphone output of the MCE325 (pins 1 and 14 of the auxiliary
connector) to the four-wire input of the VCP Control Panel; connect the four-wire output of the
VCP Control Panel to either a four-wire input or a program input of the MCE325; connect the
logic contact output of the VCP Control Station to the ISO input of the MCE325 (pin 12 of the
auxiliary connector); connect VCP common to pin 11 of the auxiliary connector.
External Headset
An external headset may be connected to the auxiliary connector. (See “Headset Requirements”.)
Connect headphone left to pin 5, headphone right to pin 18, and headphone common to pin 17.
Connect microphone high to pin 4; connect microphone low to pin 16. The external headset
connections are wired in parallel with the front panel dynamic headset connector; therefore, use
only one at a time.
In the headset connecting cable, prevent coupling between the microphone and headphone leads
by using a shielded twisted pair for the microphone, and a separate shielded twisted pair for the
headphones. Do not allow headphone common to contact microphone low. Tie the headphone
shield to headphone common. The headset cable can be made longer when the microphone and
headphone pairs are physically separated. The wider the separation, the longer the allowable cable
length. Estimated maximum usable headphone cable lengths are as follows:
Single cable, two shielded twisted pairs: 10 feet (3.05 m). Dual-ribbed cable, two shielded twisted
pairs: 30 feet (9.14 m).
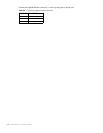
Table 2.7
Auxiliary connector, J22.
PIN # FUNCTION
6 CH 1 or four wire CH A key output
7 CH 3 or four-wire CH B key output
19 CH 2 key output
20 CH 4 key output


