


4
Getting Started
The following steps will help you set up your amplifier, and get the
levels just right.
SETTINGS:
1. Be sure the amplifier’s POWER switch is off.
2. Turn down both Level controls.
3. On the rear panel, set the SUBSONIC FILTER
switch OFF and the CLIP LIMIT switch ON.
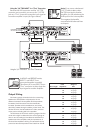
4. Determine which AMP MODE is best for your
application:
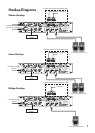
STEREO mode is the typical setup for amplifying
stereo signals. INPUT 1 is routed to CHANNEL
1 output, and INPUT 2 is routed to CHANNEL 2
output.
MONO mode is used for sending a mono signal
to both outputs, with separately adjustable level
controls. INPUT 1 is used in MONO mode (leave
INPUT 2 disconnected).
BRIDGE mode uses both outputs to double
the power to one speaker (or set of speakers).
INPUT 1 is used in BRIDGE mode (leave INPUT 2
disconnected and the B Level control turned down).
NOTE:
4 ohms is the minimum speaker impedance
you should connect to the amplifier in BRIDGE
mode. See “Do the Math” in Appendix B for
information on calculating speaker impedances.
5. Set the AMP MODE switch according to your
application.
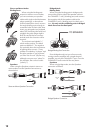
CONNECTIONS:
1. Using balanced cables, make connections from
your mixer (or other signal source) MAIN OUT to
your amplifier’s INPUTs.
2. In STEREO mode, connect the cables from your
signal source to the amplifier’s INPUT jacks,
either XLR or 1/4” TRS.
• The XLR and TRS inputs for each channel are
wired in parallel.
• The balanced XLR inputs are wired as follows:
Pin 1 = shield (ground)
Pin 2 = hot (+)
Pin 3 = cold (–)
• The 1/4” TRS inputs are wired as follows:
Tip = hot (+)
Ring = cold (–)
Sleeve = shield (ground)
3. In MONO mode and BRIDGE mode, connect
one cable from the input source to INPUT 1, and
connect nothing to INPUT 2.
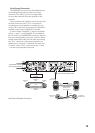
4. In STEREO and MONO modes, connect speaker
cables to the SPEAKER OUTPUTS, either the
binding posts or the Speakon
®
connectors.
• The binding post connectors are wired as
follows:
red = hot (+ speaker terminal)
black = cold (– speaker terminal)
• The Speakon connectors are wired as follows:
1+ = hot (+ speaker terminal)
1– = cold (– speaker terminal).
5. In BRIDGE mode, if using the binding post
outputs:
• CHANNEL 1 SPEAKER OUTPUT red post = hot
(+ speaker terminal)
• CHANNEL 2 SPEAKER OUTPUT red post =
cold (– speaker terminal)
Do not use the black terminals.
If using a Speakon connector, connect the
Speakon to the center BRIDGED connector.
• The BRIDGED Speakon connector is wired as
follows:
1+ = hot (+ speaker terminal)
2+ = cold (– speaker terminal).
6. Plug all the sound system components into
suitable AC outlets, properly grounded and
capable of delivering adequate current.
7. Make sure your signal source is powered up and
delivering signal to the amp.
8. Turn the power amplifier’s switch on. Verify that
the POWER LED lights.
9. Slowly turn up both Level controls on the
amplifier. You should hear music and see the
SIG LEDs flashing. If the OL (Overload) LEDs
are flashing, turn down either the Level controls
on the amp or the source signal’s output level
controls (i.e., master faders), until the OL LEDs
either blink occasionally or not at all.
10.
For quieter listening, it is preferable to adjust
the amp’s Level controls rather than the source
signal’s output level (unless you have the source’s
control all the way up!).
Things To Remember:
• Never plug amplifier outputs
into anything except speakers
(unless you have an outboard box
specifically designed to handle
speaker-level signals).