10
shelf across the back of the rack, or angle brackets
attached between the rear support rails and the
rear rails of the rack. This is recommended for all
components mounted in a rack that is going to be
moved frequently (or thrown in the back of a pickup
truck and transported down a bumpy gravel road to
that outdoor festival!).
Thermal Considerations
The Juice amplifiers are fan-cooled with two
separate fans. One fan brings cool air in from the
back and the other fan blows the warm air out
the front of the chassis. Make sure that cool air is
available at the back of the amplifier, and that there
is room in the front for the warm air to exit from the
amplifier and dissipate. If rack-mounted, make sure
the air being drawn from the rack is cool. Some rack-
mounted equipment expel warm air into the rack.
When the amplifier is first turned on, the fans run
at low speed. As the power output increases and
the amp warms up, the fans gradually increase in
speed to provide additional cooling.
AC Power Considerations
Be sure the amplifier is plugged into an AC outlet
that is able to supply the specified voltage. Be sure
the AC outlet can supply enough current to allow
full power operation of all the amplifiers plugged
into it. The outlet should be a three-prong socket
that matches the power cord.
WARNING: Bypassing the
plug’s safety ground pin can be
dangerous. Don’t do it!
The AC current demand of an amplifier varies
depending on several factors, including the load
impedance, the crest factor, and the duty cycle of
the program material. Under typical conditions
reproducing rock music where musical peaks are
just below clipping, the Juice amplifiers require the
following average currents.
J•800 = 5 A
J•1400 = 7 A
J•2500 =10 A
It is recommended that a stiff supply of AC
power be used because the amplifier places high
current demands on the AC line. The more power
that is available on the line, the louder the amplifier
will play and the more peak output power will be
available for cleaner, punchier bass.
If you have more than one amplifier sharing an
AC outlet, you should avoid turning them all on at
the same time. Rather, sequence them on, one at a
time, to prevent popping the circuit breaker (due
to in-rush current).
Input Wiring
Use a high-quality 3-conductor shielded cable
to connect the signal between the signal source
(mixing console, equalizer, etc.) and the balanced
inputs to the amplifier. If you are using unbalanced
inputs, use a high-quality 2-conductor shielded
cable. Your TAPCO Dealer can recommend a
suitable cable for your application.
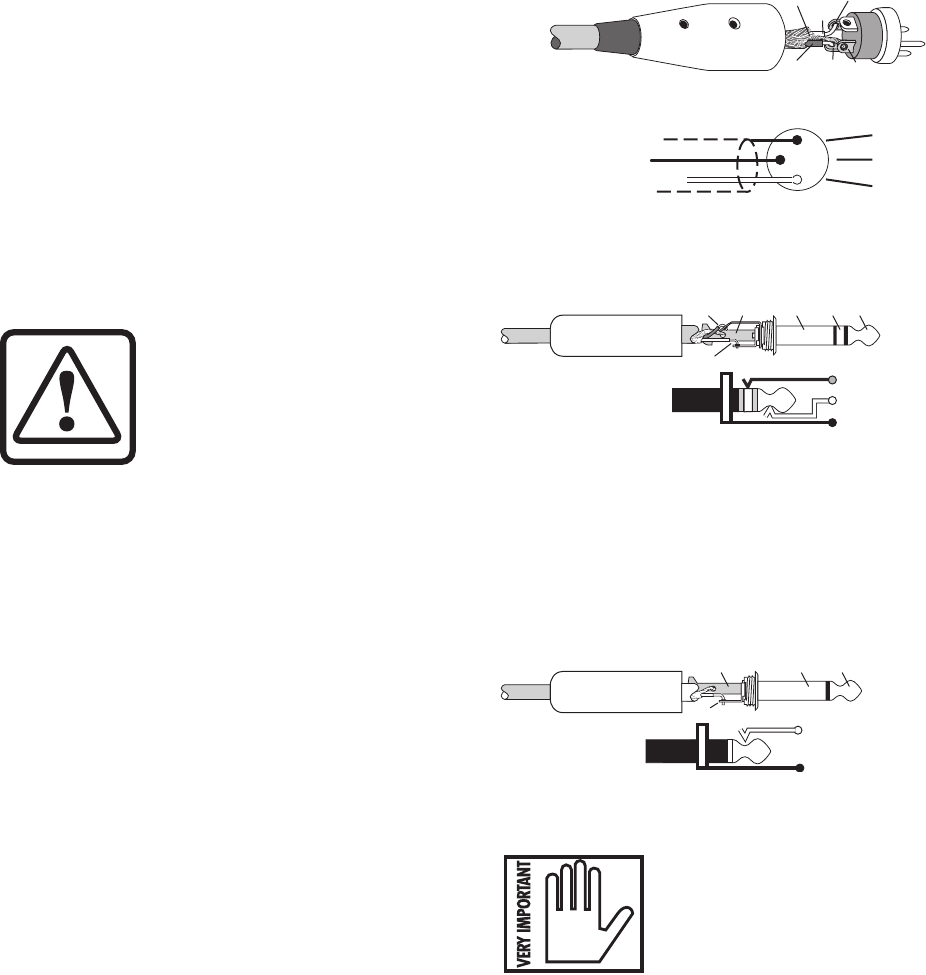
When connecting a balanced signal, the
connectors are wired thusly, according to the AES
(Audio Engineering Society) standards:
XLR TRS
Hot (+) Pin 2 Tip
Cold (–) Pin 3 Ring
Shield (Gnd)
Pin 1 Shield
2
3
1
SHIELD
COLD
HOT
SHIELD
COLD
HOT
3
2
1
Balanced XLR Connector
SLEEVE
TIP
SLEEVE
TIP
RING
RING
TIP
SLEEVE
RING
Balanced 1/4" TRS Plug
Unbalanced TS (Tip-Sleeve) lines can be
accommodated via the TRS jack. Make sure the cord
terminates with a TS plug (like a guitar plug), or if it
is a TRS plug (like a headphone plug), make sure the
ring is tied to the shield, preferably at the source.
SLEEVE
TI
P
TI
P
SLEEVE
TIP
SLEEVE
Unbalanced 1/4" TS Plug
If you set the AMP MODE switch
to MONO or BRIDGE, use the
INPUT 1 input only.


