


HTS Manual 3/3/06 14:50 Page 6
Composite
C M Y CM MY CY CMY K
PERFORMANCE
Power output
Frequency response (-6dB)
Crossover frequency
Driver
Inputs
Power requirements
Fuse ratings
Additional features
Weight
Dimensions H x W x D
Finish
Supplied accessories
100 Watts
29Hz - 200Hz
50Hz to 200Hz variable control
200mm (8 inch) paper cone, long throw
Line Input (LFE RCA/Phono) or Left & Right speaker level input.
115 or 230V AC / 50 - 60 Hz, switching facility on amplifier panel, 60VA
AC 100-120V/60Hz - Fuse: T1.6A L /125V
AC 220-240V/50Hz - Fuse: T800mA L /250V
Energy saving AUTO power function
Switchable phase 0 or 180 degrees
Crossover and Volume control
10.2KG (22.4lbs)
420 x 275 x 405mm (16.5 x 10.8 x 16 inches)
Cherry wood finish
Port tube air flow modifier
Country specific mains cable (cord)
TOWER SPEAKER
25 - 100 Watts
88dB
6 ohm
80Hz to 40kHz
HF: 19mm (3/4inch) titanium WideBand™ dome, with neodymium magnet system
2 x LF: 75mm (3 inch) paper cone
3kHz (LF to HF)
Yes
5.8KG (12.8lbs)
940 x 120 x 170mm (37 x 4.7 x 6.7 inches)
Cherry wood finish
Adjustable coupling spikes and wood floor protectors
PERFORMANCE
Recommended amplifier power
Maximum Sensitivity (2.83Volts @ 1m)
Nominal impedance
Frequency response (-6dB)
Drivers
Crossover frequency
Magnetic shielding
Tower Weight
Tower Dimensions H x W x D
Finish
Supplied accessories
25 - 100 Watts
87dB
Centre 8 ohm
Satellite 6 ohm
100Hz to 40kHz (Centre & Satellites)
HF: 19mm (3/4inch) titanium WideBand™ dome, with neodymium magnet system
LF: 75mm (3 inch) paper cone
3kHz (LF to HF)
Yes
1.3KG (2.9lbs)
162 x 120 x 170mm (6.4 x 4.7 x 6.7 inches)
2.7KG (5.9lbs)
120 x 355 x 170mm (4.7 x 14 x 6.7 inches)
Cherry wood finish
Centre support platform,
Satellite wall brackets
20metres (65 ft) speaker cable
Satellite floor stands with mounting brackets available in black finish
CENTRE & SATELLITE SPEAKER
PERFORMANCE
Recommended amplifier power
Maximum Sensitivity (2.83Volts @ 1m)
Nominal impedance
Frequency response (-6dB)
Drivers
Crossover frequency
Magnetic shielding
Satellite Weight
Satellite Dimensions H x W x D
Centre Weight
Centre Dimensions H x W x D
Finish
Supplied accessories
Optional accessories
SUBWOOFER
SETTING UP TO LISTEN
Make sure the POWER switch on the HTS subwoofer is in
the OFF position. Set the subwoofer controls as follows:
• Set the HTX subwoofer VOLUME to MIN, PHASE SWITCH
to 0, CROSSOVER to half way between 50 and 200
(marker pointing vertically).
• Set your 5.1 receiver/decoder to SMALL SPEAKERS, LFE
or SUB output to ON, switch the rest of your system ON
and play a favourite movie. Refer to the equipment
manufacture's instruction manual if you need help in
making these settings.
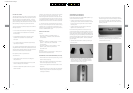
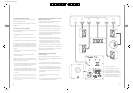
ALTERNATIVE METHODS OF SUBWOOFER
CONNECTION
If you are using the HTS system with equipment which does
not have a special subwoofer output, or, for simple 2 channel
stereo with additional subwoofer (2.1 operation) you can
connect the subwoofer using your amplifier's speaker output
terminals to provide speaker signal level feeds to the HTS
subwoofer 'SPEAKER LEVEL' inputs as follows:
• Prepare 2 lengths of twin speaker cable. One from the
left channel amplifier output terminals to the subwoofer
and one from the right channel amplifier output terminals
to the subwoofer. These cables will provide the subwoofer
signal feeds and can be simple stranded twin core cable
(Class 2 insulation) as they will not be carrying any power,
only signals.
• Remove the existing speaker cables from your amplifier
terminals in turn and twist the speaker and subwoofer
signal feed cables together and reconnect to each terminal.
Remember to keep +/RED to +/RED and -/BLACK to
-/BLACK meticulously on both sets of cables.
• If your amplifier has two sets of speaker terminals, usually
labelled 'A' and 'B' you can use the unused second set to
connect the subwoofer feed cables. Remember to switch
the second set of speakers ('B') to 'on' if necessary.
• Make sure the polarity of the speaker cables and the
subwoofer cables is correct - failure to observe this may
result in short circuits and consequential damage to
your amplifier.
• At the subwoofer connect the left feed cable to the SPEAKER
LEVEL terminals marked + LEFT - and the right feed
cable to the terminals marked + RIGHT -
• Do not switch the subwoofer on at this stage. Make sure
that the mains power switch on the subwoofer is set to
OFF by pushing the power switch rocker adjacent to the
OFF label and that the mains lead is not connected to
the wall socket.
• Connect the HTS subwoofer to a convenient mains socket
using the lead and plug supplied.
• Switch the HTS subwoofer to ON and set the VOLUME
half way between MIN and MAX. Assess the bass signal
strength and adjust VOLUME accordingly.
The purpose of a subwoofer is to enhance the bass or low
frequencies but not to overpower the music or film dialogue.
The set up can be checked by using the noise signal calibration
facility in most 5.1 receivers/decoders. Using this noise signal
the HTS subwoofer will produce a low frequency sound a little
like a continuous distant thunderstorm. The noise signal
should be of the same loudness from all the speakers as the
test signal cycles round the system. Adust the individual
channels on the decoder to achieve this.
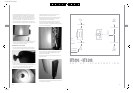
SUBWOOFER PORT TUBE AIR FLOW MODIFIER
A round port plug is supplied and fitted to the subwoofer port.
For DVD movies the port plug can be removed for improved
low frequency impact. For DVD music videos and CDs the
port plug can be fitted to the port for improved bass quality
and depth; for best quality reproduction with this type of
material the subwoofer CROSSOVER control should be set
between 50 and half way. For maximum impact with movies
the port plug should be removed and the CROSSOVER control
set to between half way and 200. Experiment for the best
effects in your room.
POSITIONING THE SUBWOOFER
The HTS subwoofer produces low frequency sounds only. It
is difficult to detect the location of low frequency sounds by
ear. The subwoofer can therefore be placed in any convenient
position in the room, but optimum performance will be gained
by locating the subwoofer somewhere between the front pair
of speakers. Low frequency output will increase when placed
next to a wall and especially so when placed in a corner, so
use the VOLUME control to compensate if moving your
subwoofer around the room. The phase of the subwoofer
may be changed between 0 & 180 degrees by operating the
switch on the back panel. In certain room positions the bass
quality may be improved by switching to 180°. This is best
checked by experimentation.
AUTO POWER/ SLEEP FUNCTION
The HTS subwoofer can be left permanently switched ON.
When a signal is present from the 5.1 decoder it will 'waken
up' and operate normally. When a signal is absent for
approximately 20 minutes it will go back to 'sleep mode' and
consume very little power. If you are not using your subwoofer
for long periods of time, for example going on holiday, then
switch to OFF and remove the power cable plug from the
mains outlet.
10 11