


Setup, calibrating and integration
What’s to know? Setup is easy! However, there are key steps
which must be done carefully and correctly, read on:
Unpacking. Take a few moments to carefully unpack everything. Save
the box and shipping materials, just in case you need to return the sub
for any reason.
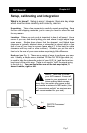
Location. Where you put a sub is important to how it will sound. Use a
corner if you can, and avoid putting your sub where it might adjoin large
open areas. Studies have shown that the deepest and flattest bass
response is typically attained when a subwoofer is placed within a few
feet of one of your room’s corners (leave about 3” in the back for cable
clearance with any wall or other surface). Whether you put the sub in
front or to the rear of your room makes surprisingly little difference.
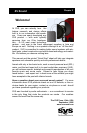
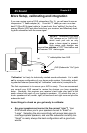
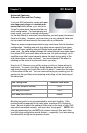
Hook-up (see Fig. 1). There are a variety of ways to configure your new
sub. Usually, a simple mono, shielded 75 Ohm A/V RCA type cable (a.)
is used to take the subwoofer output of your AVR (b.) and feed one low-
level input of the sub’s amp. There is no need to “split” the signal going
to the sub (c.). You can feed either one of the two amp inputs, it
doesn’t matter, right or left.
SV Subwoofers
Chapter 6-1
SV Sound
Fig. 1
DD/DTS Processor/
Receiver
(a.)
(b.)
(c.)
NOTE: Take time to review
your AVR manual. Ensure all
power to your equipment is off
when making these connec-
tions. Also, be certain your power outlet
can handle a minimum of 600 watts. (Use
of “convenience outlets” on receivers are
not recommended for your sub).