


User's Manual
5
CHAPTER 1
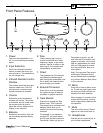
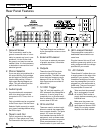
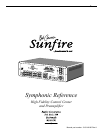
Front Panel Features
1. Power
This turns the preampliÞ er on or
off. It is a non-latching mo men tary
button.
2. Input Selectors
Press one of these illuminated
buttons to select the source you
want to listen to. The selected but-
ton will change color.
3. Infrared Remote Control
Window
This window should be clean and
free from ob struc tion. The LED
will light when a remote control
infrared command is received.
4. Volume
Rotate this control clock wise to
increase the volume. The control
is motorized, and will rotate when
the remote control is used to
adjust the volume. Make sure its
rotation is not restricted.
5. Balance
Rotate this to the left or right until
the soundstage appears equally
balanced.
6. Tone
These controls apply a cut or
a boost to the Bass and Treble
frequency ranges. In the center
position, there is no effect on the
audio signal. The controls work
independently of each other.
7. Direct
This bypasses the Tone controls
and allows the shortest signal
path through the preampliÞ er. Use
this to obtain the cleanest direct
sound through your system.
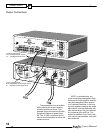
8. External Processor
Press this to route the preampli-
Þ er signals through an external
processor or graphic equalizer.
9. Tape Monitor
Press this to engage the Tape
Monitor Loop. This is used for
Tape players such as three-head
designs, which allow you to
monitor the actual sound being
recorded.
For example, if you wanted to
record a CD, you would select
the CD input and then press this
Tape button. When you set your
Tape player to record, you will
then hear the CD sound as it will
appear on the tape. You will also
hear any adjustments you make
with your Tape player's controls,
such as record level, bias or re-
cord balance.
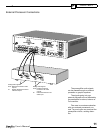
Note: The rear panel Tape output,
and External Processor output,
are not affected by the preampliÞ -
er's Volume, Balance, Mute, Mono
or Tone controls.
10. Mono
Press this to listen to Mono sourc-
es. The left and right signal paths
are joined, so Mono sources can
be heard from both speakers.
When engaged, a correctly set up
system should produce a strong
center image directly between the
two speakers.
11. Mute
This turns off the sound. Press it
again to turn the sound back on.
12. Headphones
Use this jack to connect a pair of
your favorite headphones.
143
566789101112
2 2