3
CONTROLS OVERVIEW
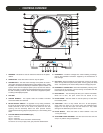
1. REVERSE - This button is used to reverse the direction of the platter
rotation.
2. START/STOP - Press this button to start or stop the platter.
3. STROBE DOTS - The dots around the edge of the platter are used in
conjunction with the light located inside the motor ON/OFF switch. While
the platter is in rotation, the dot s help to indicate the speed of rotation. The
speed is lower than the displayed speed (33,45,78) when the dots are
flowing to the right. It is higher than the displayed speed (33,45,78) when
the dots are flowing to the left. When the strobe is stopped,the platter
is rotating at the displayed speed.
4. SLIP MAT
5. CENTER SPINDLE - This spindle holds the turntable PLATTER
and records stable and centered.
6. MOTOR ON/OFF SWITCH - As opposed to fully analog turntables,
this is not the power switch. This switch only turns the motor on or off.
Rotate clockwise to turn on the motor. The platter will not start
spinning until the start/stop button has been pressed. Rotate
counterclockwise during playback (off position) for a slow winding down
effect.
7. PLATTER REVOLUTION SPEEDS (rpm)
33 rpm – Press 33
45 rpm – Press 45
78 rpm – Press the 33 and 45 buttons simultaneously.
To return to 33 or 45-rpm play mode, just press the desired button.
8. HEADSHELL - Install the cartridge here. When installing a cartridge,
refer to the installation instructions supplied by the manufacturer of
that cartridge.
9. KEY LOCK - Press to enable key lock. When Key Lock is on, the pitch
slider will only affect the speed of the platter. The key (pitch) will remain
at 0%. This speeds up the musical tempo without changing the pitch.
10. HEADSHELL LOCKING NUT - Attach the headshell by inserting it into
the front end of the tone arm. Turn the locking nut clockwise with the
head shell firmly held horizontally.
11. PITCH ON/OFF - The ON setting will allow you to use the Pitch Slider.
When set to OFF, the pitch control will be locked at 0%.
.
12. PITCH SLIDER - The Pitch Slider is used to speed up or slow down
the turntable platter.
13. TONE ARM - This is a fully manual tone arm. To start playback,
gently place the stylus on the record using the headshell finger
support. Do not drop the stylus onto the record as it may cause
damage to the diamond tip and to the record.
14. PITCH SELECT - Press the button to select between +/-8% and
+/-12% pitch range.
15. TONE ARM CLAMP AND REST - Use this rest for the tone arm and
clamp it in position during transportation.
T.90USB
21
22
23
25
26
3
4
5
6
2
7
11
13
18
19
20
8
12
17
1
2
14
24
9
10
15
16


