


10 7
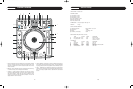
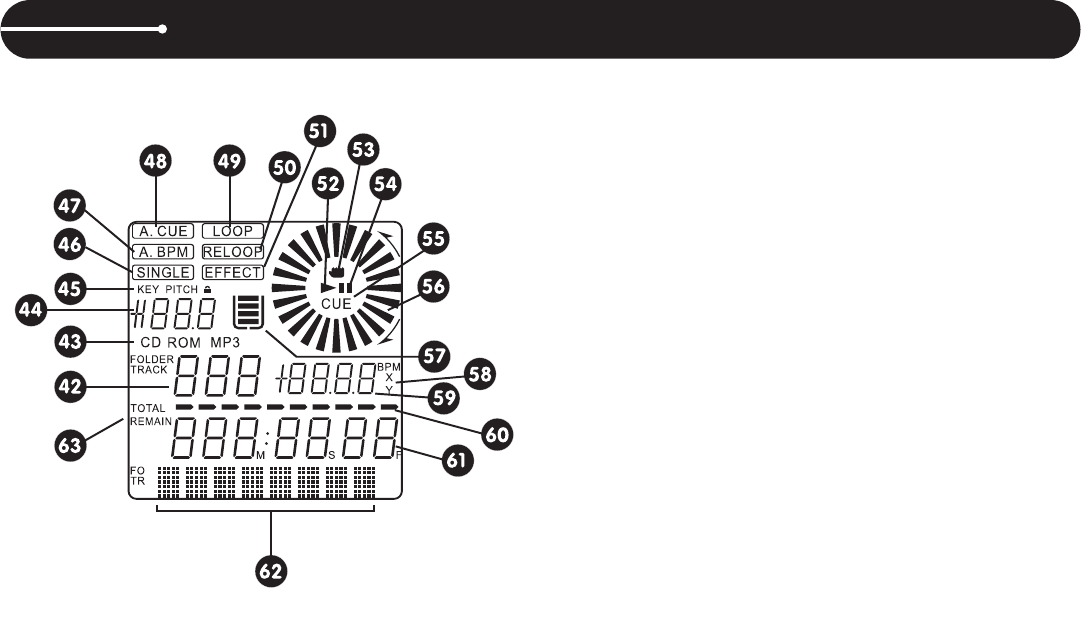
42. TRACK – Indicates the current track selected or being played.
43. CD/MP3 – Indicates whether the current disc is a standard audio disc
or an MP3 disc.
44. PITCH VALUE – Shows the percentage of the pitch slider.
45. LOCK - Shows when Pitch Lock and/or Key Lock are active.
46. SINGLE – Controlled by the CTN/SGL button, this indicates when the
unit is set to play just one track at a time. When this is not illuminat-
ed, the CD will play continuously through all tracks.
47. A.BPM – Indicates when Auto BPM is active. To activate, press and
hold the TAP button.
48. A.CUE – Indicates when Auto Cue is active. To activate Auto Cue,
press and hold the SGL/CTN button
49. LOOP – Indicates when the CD is in loop mode.
50. RELOOP – Indicates when there is a previously set loop, and that the
loop is ready to be played again.
51. EFFECT – Indicates when an effect is active.
52. PLAY – Indicates when the unit is currently playing a CD.
53. HAND – Indicates when the touch sensitive surface of the jog wheel
is active.
54. PAUSE – Indicates the unit is in CUE or PAUSE mode.
55. CUE – Indicates the unit is at a cue point and is ready to play.
56. WHEEL INDICATOR – This is a visual representation of a vinyl mark-
er, which is traditionally used to mark the location of a certain sound
or cue point on a vinyl record. Here, it indicates the play position,
rotates during playback in either direction, and stops during cue or
pause mode. It also indicates the speed of the forward and reverse
search operation.
LCD DISPLAY
57. ANTI SHOCK AND BUFFER INDICATOR – Indicates the current sta-
tus of the buffer memory. This is represented on the display by a
bucket being filled or emptied. The bucket itself represents the
instant start function (which works by buffer memory). If the bucket is
flashing, the instant start is not available. Each bar within the bucket
represents 2 seconds of anti shock protection. There is up to 10 sec-
onds of anti shock protection available. It is recommended to let the
bucket fill up before using the jog wheel in vinyl mode.
58. X/Y/BPM – Indicates whether PARAMETER (#59) is displaying the
BPM or effect parameters
59. PARAMETER – Shows the current BPM count, or tempo of the
music. Also shows the effects TIME and RATIO parameters while
they are being adjusted.
60. TIME BAR – Shows a proportionate visual representation of the time
remaining or time elapsed.
61. TIME DISPLAY – Displays the time of track(s) currently selected in
increments of Minutes, Seconds, and Frames.
62. TEXT – The text portion of the display (the bottom row) is mainly
used to display MP3 file names or CD text information. It is also used
to display various messages, such as effects parameter settings and
more. See operating instructions for further explanation.
63. ELAPSED / TOTAL / REMAIN – Indicates whether the time shown on
the display refers to total remaining time or track remaining time. If
either of these are not illuminated, this indicates elapsed track time.
BEAT MATCHING
Adjusting the Pitch
With your first deck playing and your second deck cued, start playback in
sync with the downbeat of the song playing on the other deck. Quickly
adjust the pitch using the PITCH SLIDER to match the tempo of deck one.
Moving the slider up (away from you) will decrease the tempo, while mov-
ing it down will increase the tempo.
Pitch Bending
As you are finding the right tempo, the track position will drift until it is fine-
tuned and the tempo is matched. Pitch Bending provides a quick fix to
keep the position as close as possible to deck one. Pressing the PITCH
BEND – or PITCH BEND + buttons will decrease or increase the speed of
playback temporarily. The extent to which the speed is changed is propor-
tionate to the amount of time the button is pressed. For example, if the
PITCH BEND + button is held in continuously, the speed continues to
increase until the maximum limit set by the PITCH RANGE is reached.
Once the PITCH BEND + button is released the pitch will return to the pitch
set by the PITCH SLIDER.
The jog wheel can also be used to temporarily bend the pitch of the music
during normal playback. Rotate the wheel clockwise to speed up and
counter-clockwise to slow down. The speed that you rotate the jog wheel
determines the percent of pitch bend. It is recommended that you use the
outer edge of the jog wheel for this type of control, as touching the top sur-
face may cause interruption of playback in certain modes of operation.
Key Lock
This functions allows the tempo or BPM of the music to be altered without
affecting the musical key. While this button is illuminated, the key will be
locked at zero. This is handy when accelerating tracks to avoid the chip-
munk effect.
VINYL AND SCRATCHING
Vinyl Mode
In Vinyl Mode the inner jog wheel will simulate the behavior of a turntable.
The top surface of the wheel is touch sensitive. Putting your hand on the
wheel will stop playback, as it would on a vinyl record. Once playback is
stopped, moving the wheel back and forth will create a scratching effect,
like on an analog turntable.
• To activate Vinyl mode, press the VINYL button.
Adjusting the Vinyl Start and Brake times
You can adjust the start and brake times so it starts up like a turntable
when pressing the PLAY/PAUSE button while in vinyl mode.
• Hold the VINYL button until is starts flashing
• Use the encoder labeled VINYL START (left) to adjust the start time.
Simply turning the encoder will fine tune the start time. For a faster
adjustment, push down on the encoder while turning the outer jog wheel.
• Use the right encoder, labeled VINYL BRAKE to adjust the brake time.
Follow the same instructions as for the start time.
• Press the VINYL button to exit
Touch Rewind
With this feature active, every time you touch the top wheel surface, play-
back pause and return to the last cue point. Upon releasing the wheel,
playback will resume from that cue point. This enables a quick and effec-
tive beat juggling effect with a single record… or cd rather.
• To activate Touch Rewind mode, press the TOUCH REWIND button.
USING EFFECTS
Effects
There are seven on-board effects: auto filter, manual filter, echo, pan,
phase, flanger, and transformer. Up to three effects can be used simulta-
neously.
• To activate an effect, simply tap the desired FX SELECT button. Both fil-
ters are activated via the FILTER button. The manual filter is activated by
holding down the button until it lights up green.
Parameters
• Use the Time Division Indicators to change the effects time in sync with
the music, or the FX TIME encoder to adjust it manually. When 1/4 is
selected, the activated effect will modulate with every quarter beat; 1/2
signifies half beats; 3/4 signifies three quarter beats; 1/1 signifies one
beat; 2/1 signifies 2 beats; and 4/1 signifies 4 beats (1 measure).
• The FX RATIO encoder controls the depth, feedback, or level, depending
on the effect. This parameter can also be controled by the outer jog
wheel by activating the OUTER JOG button.
Hint: With OUTER JOG active, turn on the manual filter by holding the
FILTER button. Now, turn the outer wheel to create a filter sweep.
c314_manual.qxd 5/24/06 9:43 AM Page 7