


12 5
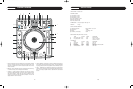
6. BROWSE – This button activates the browsing feature. As the name
goes, it allows you to browse the tracks on your CD without actually
selecting each one as you go down the list. With this function active,
turn the encoder to browse, and push on the encoder to select. This
function works with both MP3 and audio discs.
7. FX TIME ENCODER – This multi-function encoder controls various
parameters of the unit, depending on the selected mode: FX Time,
Sampler volume, Vinyl start time, and MP3 browsing. See operating
instructions for further explanation.
8. MINUS BUTTON – Moves the Time Division Indicator (#10) to the left
[for use with the DSP FX (#14)].
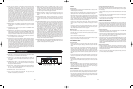
9. LCD DISPLAY – Shows various information on the status, modes, and
functions of the unit.
10. TIME DIVISION INDICATOR – Indicates the time division (in beats)
used by the DSP FX (#14). When 1/4 is selected, the activated FX will
modulate with every quarter beat; 1/2 signifies half beats; 3/4 signifies
three quarter beats; 1/1 signifies one beat; 2/1 signifies 2 beats; and 4/1
signifies 4 beats (1 measure).
11. FX RATIO ENCODER – This multi-function encoder controls various
parameters of the unit, depending on the selected mode: FX Ratio,
Sampler pitch, Vinyl brake time, and MP3 folder browsing. See operat-
ing instructions for further explanation.
12. FOLDERS – With the browsing function active, this button enables
browsing folders on an MP3 disc. With this function active, turn the
encoder to browse folders. Disable to browse all tracks on the disc.
13. PLUS BUTTON – Moves the Time Division Indicator (#10) to the right
[for use with DSP FX (#14)].
14. FX SELECT – These six buttons refer to each of the individual DSP
effects. Press once to engage (illuminated) and press again to disen-
gage. Use the TIME KNOB, RATIO KNOB, MINUS BUTTON, and
PLUS BUTTON to fine tune the parameters used for these FX. In the
case of the Filter effect, pressing once engages or disengages the auto-
filter effect (illuminated red). Holding down the button engages the man-
ual filter effect (illuminated green).
15. OUTER JOG BUTTON – Activates the outer jog wheel to control the
DSP effects Ratio parameter. This function is only active when an effect
is on. If Jog is on but all effects are off, the outer wheel still controls the
pitch bend.
16. TAP BUTTON - Tap along with the music to enter manual BPM values
for use with DSP FX. This is generally used to manually calculate
BPMs when the Auto BPM function is unable to lock onto a consistent
beat. You must tap at least four times in order for a calculation to occur,
and the calculation will only be as accurate as your tapping. Using this
button will disengage the Auto BPM function. To return to Auto-BPM,
simply hold down the Tap button until the display reads A.BPM in the
top left corner.
17. PITCH RANGE INDICATORS – Indicates the pitch range in percent as
selected by #19.
18. KEY LOCK BUTTON – Enables the key lock function, which allows the
tempo or BPM of the music to be altered without affecting the key. This
button is illuminated when enabled.
19. PITCH RANGE BUTTON – Selects between a pitch range of +/- 8, 16,
25, or 100%.
20. PITCH LOCK BUTTON – When illuminated, the pitch control is locked
at 0%, regardless of the pitch slider’s position.
21. JOG WHEEL – This touch-sensitive wheel has multiple functions:
a. When in pause or cue mode (without vinyl mode engaged), the jog
wheel can be used as a frame search control, allowing you to set it to a
specific point (frame).
b. During normal playback (without vinyl mode engaged), the wheel works
as a pitch bend, similar to a “push” or a “drag” on a turntable. Turning
the wheel counter-clockwise temporarily slows down the playback
speed according to the speed, velocity, and duration that’s applied to
the wheel. Turning the wheel clockwise temporarily speeds up the play-
back speed. Pitch will return to the current setting when the wheel
stops.
c. When in VINYL mode, the top platter acts just like a vinyl turntable, mov-
ing the playback position forward or back in response to your move-
ments. The outer jog wheel still performs the pitch bend function (or
effects ratio when Jog is on).
d. TOUCH REWIND mode is similar to vinyl mode, except playback returns
to the Cue point anytime the top platter is touched. The outer jog wheel
still performs the pitch bend function (or effects ratio when Jog is on).
e. The wheel can also be used to adjust the out point of a loop. Activate the
Loop Out Adjust mode by holding down the Loop Out button until the
numeric position shows at the bottom of the display. Turn the wheel to
the new out point. Press Loop Out again to save the new point and exit
the mode, or press Reloop to exit and return to the previous out point.
22. PITCH SLIDER – Used to adjust the playback pitch percentage. The
slider is a set adjustment and will remain set until it is either moved, or
the PITCH LOCK is turned on.
23. PITCH BEND BUTTONS – Used to temporarily decrease or increase
the playback speed. Pitch will return to the current setting when
released.
24. SAMPLER BUTTON – Once cue and/or loops are saved to one or all
of the MEMORY PADS (#26) the SAMPLER button can be engaged
(illuminated blue). Once in this mode, sounds stored in the MEMORY
PADS will play regardless of whether the unit is in CUE, PLAY, or
PAUSE mode. This means that you can play samples at the same time
that your CD is playing. Press the SAMPLER button again to disable
and stop sample playback. The audio sample can even play after the
disc has been ejected. The sampler pitch can be adjusted by turning
the TIME KNOB, or by pressing the button down and rotating the JOG
WHEEL simultaneously. The sampler volume can be adjusted by turn-
ing the RATIO KNOB or by pressing the button down and rotating the
JOG WHEEL simultaneously. By using the SAMPLE MODE button
(section #34), samples can be played once, or looped continuously.
SAVING PRESETS AND CUE POINTS
This unit will retain the setting you have made for most of the functions
even if you unplug it. These functions include Pitch Range, Pitch Lock, Key
Lock, effects, Vinyl and Touch Rewind, Single/Continuous, Auto BPM, and
Repeat.
In addition, the unit will save and recall cue points and loops saved to the
four pads for up to 500 CD's.
• To save cue points, loops, and setting, press and hold the SAVE button
until the display reads SAVING
For example, if everytime you turn on the unit you want it to load up in vinyl
mode, with the pitch range set to 16%, single mode, and auto cue on, turn
on all those functions and save.
WARNING: Do not power off the unit right after saving. You must wait
at least 3 seconds in order for the new presets / cue points to be
stored in memory.
JOG WHEEL SENSITIVITY
The touch sensitivity of the jog wheel can be adjusted to fit the needs
and feel of different users. When adjusting the sensitivity, be con-
scious of extreme settings which may affect your performance.
Setting the sensitivity too high would engage the touch sensitivity
with the hand just above the wheel. Setting the sensitivity too low
may not engage the touch even while pressing firmly on the wheel.
• To adjust the jog wheel touch sensitivity, press and hold the PITCH
BEND button while turning either encoder. Release PITCH BEND
when done. Wait at least 3 seconds before powering off the unit.
FACTORY SETTINGS
To return to factory settings…
• Power off the unit
• Press and hold the CLEAR button as you power up the unit,
• The display will read clearALL, release the CLEAR button
WARNING: Restoring factory settings will delete cue point memory.
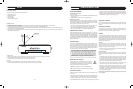
FADER START
By connecting the CD player to a mixing board that has the fader start fea-
ture, the crossfader will engage playback or cue mode depending on its
location. If the CD player is connected to the left side of the crossfader,
playback will start once the fader is moved from the left most position
towards the right. The CD player will re-cue itself when the crossfader is
brought back to the left most position. Two CD players can be hooked up
in this fashion to work on both sides of the crossfader.
RELAY PLAY USING TWO PLAYERS
When both CD players are connected to each other via their FADER
START / RELAY jacks, the players can work in unison by playing tracks
one after another from both units.
• Set both players to single play mode (the SINGLE indicator will be illu-
minated in the LCD displays).
• Begin playback on the first player.
• When the first track ends, playback will automatically start on the second
player and the first player will automatically enter standby mode.
• When the track on the second player ends, the first player will play the
next track. The players will continue to perform continuous relay play
until stopped or until the last track is played.
• You can set a cue point on the standby player to jump directly to that
point.
SLEEP
The C.314 will automatically go into sleep mode after 15 minutes of inac-
tivity. Press either the Play or Cue button to wake it up.
c314_manual.qxd 5/24/06 9:43 AM Page 5