


6 11
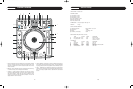
25. LOOP IN / OUT / RELOOP – These buttons control the marker points
for seamless, on-the-fly looping. Press IN to set a cue point or the
starting point of a seamless loop. Press OUT to set the ending point
of a loop, and the loop will continue to play until the OUT button is
pressed again. If a seamless loop has been made, but the CD player
is not actively in loop mode (not playing), pressing the RELOOP but-
ton will instantly reactivate the loop. Press OUT to exit the loop.
LOOP and RELOOP will appear in the LCD display when the reloop
function is available. During play mode, pressing the RELOOP button
will instantly return play to the last set point without interrupting play-
back. The wheel can also be used to adjust the out point of a loop.
Activate the Loop Out Adjust mode by holding down the Loop Out but-
ton until the numeric position shows at the bottom of the display. Turn
the wheel to the new out point. Press Loop Out again to save the new
point and exit the mode, or press Reloop to exit and return to the pre-
vious out point
26. MEMORY PADS – Four different cue points and/or loops can be saved
to these buttons. See operating instructions on page 11 for further
explanation.
27. CLEAR BUTTON – Clears cue points stored in the MEMORY PADS
(please refer to item #25).
28. SAVE BUTTON – After creating a loop point (#25), pressing this button
allows you to store the loop to one of the four MEMORY PADS. While
the SAVE button is flashing red, press one of the memory pads to store
the loop in that location. Pads can also be overwritten in the same way.
29. PLAY/PAUSE BUTTON – Press to play the CD from the current loca-
tion, or to pause it at the current location.
30. CUE BUTTON – During normal playback, pressing the button immedi-
ately returns the track to the last set cue point and pauses playback
when released. Pressing CUE again will engage the cue monitor,
which plays the track from the cue point until you release the CUE but-
ton. If you press pause (#29) at any time other than the currently
stored cue point, pressing CUE will reset the cue point to the new posi-
tion. Whenever the Cue button is flashing, pressing it will save a new
Cue point. A cue point can also be set in real time in VINYL MODE by
holding the top portion of the platter and pressing cue, a cue point will
be set at the current position.
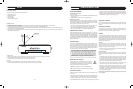
36. AUDIO OUT – This analog output signal requires a pair of RCA cables
(left and right) to be connected to a line level input.
37. DIGITAL OUT – This digital output signal requires one SP/DIF (75
Ohm, coaxial) cable to be connected to a SP/DIF input on your mixer
or computer.
38. FADER START / RELAY – This connection allows two CD players to
be linked for relay play. This can also be connected to a mixing board
that supports automatic fader start.
39. VENT SLITS – These openings are used for the proper ventilation of
the unit. In order to prevent overheating and to insure proper opera-
tion, do not cover or block these slits.
40. POWER BUTTON – Turns the unit on and off.
41. AC IN – Plug in the power supply cable here. The plug can only be
inserted in one direction, so do not force it.
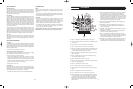
31. SEEK BUTTONS – Allows you to SEEK through a track or a CD in
either direction. While in pause mode, tracks can be moved one frame
at a time. Holding down one of these buttons will cause the search in
that direction to occur at a faster rate. Holding down either Seek but-
ton while turning the wheel will engage Fast Search.
32. SEARCH BUTTONS – Tapping one of these buttons will skip to the
previous or next track. Holding it down will rapidly skip through the
tracks.
33. OPEN/CLOSE BUTTON – Opens or closes the CD tray. The CD will
only eject while in pause or cue mode, and will not work while a CD is
playing. If the tray is left open, it will close automatically after a brief
time.
34. SAMPLER SEQUENCER – Once you have more than one pad loaded
with a cue or loop, these pads can be sequenced and played back in
succession in the order that you choose. For example, if you have all
four pads loaded, press the SAMPLER (#24) button to enter this
mode. Press the RECORD button and it will light red. Then press the
PADS buttons in the desired sequence. Up to 12 steps can be stored
in this sequence. Then press the PLAY button in the SAMPLER
SEQUENCER section and the sequence will play. Press MODE to
switch between SAMPLE or LOOP mode. SAMPLE will play the
sequence once, then end. LOOP MODE will continue to play the
sequence over and over. The SAMPLER SEQUENCER feature works
in CUE, PLAY, OR PAUSE modes. Sample mode has two functions.
When playing a sample from the memory pads, the sample will stop
playing as soon as the pad is released. Sample mode also means the
SAMPLER SEQUENCER will play through the sequence once and
end. When in Loop mode, both samples and sequences will play con-
tinuously until the sampler mode is disabled
35. REVERSE BUTTON – When engaged (illuminated) playback will occur
in the opposite direction (backwards). This function works for normal
playback, sample playback and loop playback.
CONNECTIONS
LOOPS
Creating Loops
• Engage playback by pressing the PLAY/PAUSE button, causing it to illu-
minate solid green (not flashing).
• Set the start point of the seamless loop by pressing the IN button at the
desired point in time. This will cause the OUT button to flash green.
• Set the end point of the loop by pressing the OUT button at the desired
point in time. Playback will immediately return to the previously set IN
point and play to the OUT point, creating a seamless loop without inter-
ruption. The RELOOP button will now be flashing green, and the LOOP
indicator on the LCD screen will now be flashing.
• To exit the loop, press the OUT button again. When the music reaches
the OUT point, it will play through it instead of looping back to the IN
point.
• To replay or re-enter the loop, press the RELOOP button. The loop can
be re-triggered by pressing the RELOOP button (until a new loop is cre-
ated). Press the OUT button to exit the loop again.
Modifying Loops
Once a seamless loop is created, the OUT point can be changed.
• Hold down the Loop Out button until the time position shows at the bot-
tom of the display.
• Turn the wheel to the desired out point.
• Press Loop Out again to save the new point and exit the mode, or press
Reloop to exit and return to the previous out point.
THE MEMORY PADS
Using Cue Points
• To save a cue point to an empty pad, simply press the pad. It will flash
red, and then turn solid green, letting you know that a cue point has been
stored.
• Press the button again, and playback will seamlessly restart from the
stored cue point and the button will turn red. You can repeatedly press
the Pads to create a stuttering effect. If the unit is in pause or cue mode,
pressing the button will start playback from the stored cue point, but will
only keep playing while the button is depressed, just like the main CUE
button.
• To save the current cue point (either created manually or by the Auto Cue
function), first press SAVE, then the pad on which to save the cue point.
Using Loops
• Loops must be created using the main loop interface. Once a loop Is cre-
ated, press the SAVE button followed by the pad on which to save that
loop.
Clearing the Pads
• Press the CLEAR button (#27). While it is flashing, press the pad(s) you
wish to clear and those will also flash red. Press CLEAR once more to
complete the process, and the pad lights will now turn off, letting you
know that there is no information stored in them.
USING SAMPLES
The on-board sampler simply uses cue points and loops, and plays them
back from the internal memory, independently of the audio from the disc.
• Once cue points or loops are stored to one or more of the memory pads,
pressing the SAMPLER button (#24) will engage sampler mode. SAM-
PLER button will illuminate in blue.
• Use any memory pad to trigger a sample.
Changing the Sample Pitch and Level
The pitch and level of each sample can be adjusted individually. In order to
do so, Sample mode must be active, and the sample you wish to adjust
must be playing.
• With the sample playing, press and hold the SAMPLE button until it starts
flashing.
• To adjust the pitch, turn the SAMPLE PITCH encoder. For broad adjust-
ments, press and turn the encoder.
• To adjust the level, turn the SAMPLE LEVEL encoder. For broad adjust-
ments, press and to turn the encoder.
SAMPLER SEQUENCER
Once you have more than one pad loaded with a cue or loop, samples can
be sequenced and played back in succession in the order that you choose.
This works like any ordinary step-sequencer, meaning that samples are
sequenced offline so it does not matter how quickly you trigger the sam-
ples, it will play the entire sample then move on to the next one seamless-
ly.
Creating a Sequence
• With the sampler engaged, press the RECORD button in the SAMPLER
SEQUENCER section (#34) and it will light red.
• Press the pads in the desired sequence (empty pads will not be record-
ed). Up to 12 steps can be stored. If you are recording less than 12
steps, press record again to end the sequencing.
• Press the PLAY button in the SAMPLER SEQUENCER section and the
sequence will play. Press MODE to switch between SAMPLE or LOOP
modes. SAMPLE will play the sequence once, then end. LOOP MODE
will continue to play the sequence over and over until sampler mode is
disabled. The SAMPLER SEQUENCER feature works in CUE, PLAY, OR
PAUSE modes.
Sample and Loop modes
• Sample mode has two functions. When playing a sample from the mem-
ory pads, the sample will stop playing as soon as the pad is released.
Sample mode also means the SAMPLER SEQUENCER will play through
the sequence once and end.
• When in Loop mode, both samples and sequences will play continuous-
ly until the sampler mode is disabled.
c314_manual.qxd 5/24/06 9:43 AM Page 6