


Settings
22
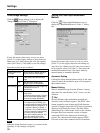
HSR-1/1P/2/2P Setting Precautions
• Always close the menu, time search, and alarm
search screens on the HSR-1/1P/2/2P before
making settings.
When the menu, time search, or alarm search screen
is displayed on the HSR-1/1P/2/2P, the error message
“The menu settings on the HSR cannot be made.
Check the statuses of the connected equipment.” is
displayed, and you cannot make any settings even if
you click the [SET] button on the “SETUP MENU”
or “MAINTENANCE MENU.” If the menu, time
search, or alarm search screen is displayed on the
HSR-1/1P/2/2P, use the unit to close the screen/s
displayed. For details on this procedure, refer to the
HSR-1/1P/2/2P User’s Guide.
• Always click the [SET] button after making a
setting.
To apply changed settings, the [SET] button must be
clicked on each page. Changes to settings will not be
saved unless you click the [SET] button.
• Display response may slow briefly while settings
are being saved.
Some display slow-down is normal while settings are
being stored in the HSR-1/1P/2/2P: this does not
indicate a problem with the video network station.
• Available settings differ according to the type of
HSR connected.
Some settings are different for the HSR-1/1P and
HSR-2/2P, which are automatically detected by the
video network station.
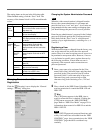
• About timer settings
Data entered in [TIMER SETTING] on the
[RECORDING FUNCTION] page is sent to the
HSR-1/1P/2/2P in sequence, starting with the first
line in each column. For this reason, if the contents of
the new setting duplicate the contents of the previous
setting, an error occurs, and you cannot make the
setting.
If this occurs, use either of the following methods to
clear the corresponding data, then enter the new time,
and make the setting.
• Select [-] in the [DAY] column and click the [SET]
button, then clear the corresponding line of data.
• Select [-] in the [REC] column and click the [SET]
button, then clear the corresponding data item.
Example:
Previously made setting:
DAY TIME REC TIME REC
MON 01:00 AM 1 02:00 AM 0
MON 03:00 AM 2 --:-- AM -
New setting:
DAY TIME REC TIME REC
MON 03:00 AM 1 04:00 AM 0
MON 05:00 AM 2 --:-- AM -
In this example, even if you click the [SET] button
after entering the new setting, an error message is
displayed, and you cannot make the setting. This is
because when the first line of the new setting (MON
03:00) is sent, it duplicates the second line of the
previous setting (MON 03:00), and the video network
station reads this as an error.
To avoid this, perform the following procedure:
1 In the [DAY] column of the previous setting's
second line, select [-] and click the [SET] button.
2 Display the [RECORDING FUNCTION] page
once again, and input the following data:
DAY TIME REC TIME REC
MON 01:00 AM 1 02:00 AM 0
--- --:-- AM - --:-- AM -
3 Enter the new setting as shown below, and click
the [SET] button.
DAY TIME REC TIME REC
MON 03:00 AM 1 04:00 AM 0
MON 05:00 AM 2 --:-- AM -