


– 7 –
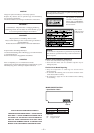
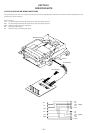
IOP DATA RECORDING AND DISPLAY WHEN PICKUP AND NON-VOLATILE MEMORY (IC171 OF BD BOARD)
ARE REPLACED
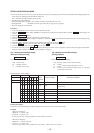
The IOP value labeled on the pick-up can be recorded in the non-volatile memory. By recording the value, it will eliminate the need to look
at the value on the label of the optical pick-up. When replacing the pick-up or non-volatile memory (IC171 of BD board), record the IOP
value on the pick-up according to the following procedure.
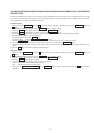
Record Precedure:
1. While pressing the ENTER/YES button and π button, connect the power plug to the outlet, and release the ENTER/YES button and
π button.
2. “TEMP CHECK” will be displayed. Press the MENU/NO button to display “Check”.
3. Rotate the – ˜ + knob to display “[Service]”, and press the ENTER/YES button.
4. Rotate the – ˜ + knob to display “lop.Write”, and press the ENTER/YES button.
5. The display becomes “Ref=@@@.@” (@ is an arbitrary number) and the numbers which can be changed will blink.
6. Input the IOP value written on the optical pick-up.
To select the number : Rotate the – ˜ + knob.
To select the digit : Press the CD SYNC/MD WM SYNC button.
7. When the ENTER/YES button is pressed, the display becomes “Measu=@@@.@” (@ is an arbitrary number).
8. As the adjustment results are recorded for the step 6 value. Leave it as it is and press the ENTER/YES button.
9. “Complete!” will be displayed momentarily. The value will be recorded in the non-volatile memory and the display will become “Iop
Write”.
10.Press the 1/u button to complete. “Standby” will be displayed.
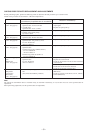
Display Precedure:
1. While pressing the ENTER/YES button and π button, connect the power plug to the outlet, and release the ENTER/YES button and
π button.
2. “TEMP CHECK” will be displayed. Press the MENU/NO button to display “Check”.
3. Rotate the – ˜ + knob to display “[Service]”, and press the ENTER/YES button.
4. Rotate the – ˜ + knob to display “lop.Read”.
5. “@@.@/##.#” is displayed and the recorded contents are displayed.
@@.@ : indicates the Iop value labeled on the pick-up.
##.# : indicates the Iop value after adjustment
6. To end, press the CD SYNC/MD WM SYNC button or MENU/NO button to display “Iop Read”. Then press the 1/u button to display
“Standby”.