


42
Editing Recorded MDs
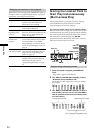
Erasing all tracks on an MD (ALL ERASE)
All tracks on the MD and the all name are erased.
1 Press MENU/NO while the recorder is stopped,
playing, or paused.
“Edit Menu” appears in the display.
2 Turn AMS (or press ./> repeatedly) until “All
Erase?” appears, then press AMS or YES.
“All Erase??” appears in the display.
3 Press AMS or YES.
“Complete!” appears for a few seconds and all the
track names and disc name are erased.
To cancel the operation
Press MENU/NO or x.
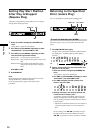
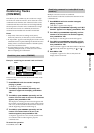
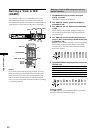
Erasing a portion of a track (A-B Erase)
You can easily erase a portion of a track by specifying the
starting and ending points of the erasure. This is
convenient for erasing the unwanted portions of
recordings of satellite or FM broadcasts.
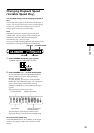
Example: Erasing portion “B2” of the second
track
AAA BBB
B1 B3B2
CCC
1 2 3
AAA
B1 B3
CCC
1 2 3
BBB
1 Press MENU/NO while the recorder is stopped,
playing, or paused.
“Edit Menu” appears in the display.
2 Turn AMS (or press ./> repeatedly) until “A-B
Erase?” appears in the display; press AMS or YES.
3 Turn AMS (or press ./> repeatedly) until the
number of the track containing the portion to be
erased appears, then press AMS or YES.
“-Rehearsal-“ and “Point A ok?” alternate in the
display and the recorder repeatedly plays the portion
of the track from the point where AMS or YES was
pressed.
4 While monitoring the sound, turn AMS (or press
./> repeatedly) to locate the starting point of
the portion to be erased (point A).
The position is moved one frame* (f) at a time (one
frame = 1/86 sec.).
* Monaural tracks or tracks recorded in LP2 stereo
move two frames at a time; LP4 stereo tracks move
four frames at a time.
To quickly choose point A
Press m/M in step 4 repeatedly to select frame,
second or minute. The selected unit flashes in the
display.
5 Repeat step 4 until point A plays properly
6 Press AMS or YES to enter point A
“Point B set” appears, and playback from point A
begins.
7 Continue playing the track or press M to locate
the ending point of the portion to be erased (point
B), then press AMS or YES.
“A-B Ers” and “Point B ok?” alternate in the display
and a few seconds of the track before point A and after
point B play back repeatedly.
8 Repeat step 4 until B has been correctly located
9 Press AMS or YES to enter point B
“Complete!” appears for a few seconds, and the
portion between A and B is erased.
To cancel the operation
Press MENU/NO or x.
Note
When “Impossible” is displayed, the portion of the track
cannot be erased.
After repeated editing of a track, it may become impossible
to erase a portion of the track any further. This is a
technical limitation of the MD system, and is not a
mechanical error.
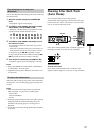
Erasing consecutive tracks (Multitrack
Erase)
Consecutive tracks can be specified to be deleted at one
time.
1 Press MENU/NO while the recorder is stopped,
playing, or paused.
“Edit Menu” appears in the display.
2 Turn AMS (or press ./> repeatedly) until “M-Tr
Erase?” appears in the display; press AMS or YES.
3 Turn AMS (or press ./> repeatedly) until the
number of the first track to be erased appears, then
press AMS or YES.
4 Turn AMS (or press ./> repeatedly) until the
number of the last track to be erased appears, then
press AMS or YES.
“M-Tr Ers OK?” appears with the numbers of the first
(
) and last (#) tracks also appearing as “ - #→Ers”.
5 Press AMS or YES
“Complete!” appears for a few seconds, and the tracks
selected in steps 3 and 4 are erased.
To cancel the operation
Press MENU/NO or x.