


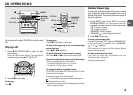

17
En
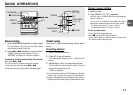
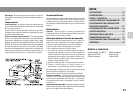
Timer recording
Timer recording is available only for TUNER and AUX (with an
external timer) sources.
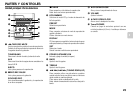
1
Hold down SHIFT and press TIMER on the remote
control repeatedly so that "5 REC" lights up and
"5 REC" is displayed.
2
Within 8 seconds, press SET.
3
Press f or g to set the timer-on time, and
press SET.
Each press changes the time in 1-minute steps.
Holding these buttons down will vary the time in 10-minute
units.
4
Press f or g to select the source, and press
SET.
•For timer recording of a radio broadcast, select "TUNER".
You will select the band later in step 7.
•For timer recording of the equipment connected to the
AUX IN jacks, select "AUX".
5
Press f or g to set the timer-activated
duration, then press SET.
With each press, the timer-activated duration changes in
5-minute steps between 5 to 240 minutes.
6
Press f or g to adjust the volume for timer
recording, and press SET.
The volume level can be adjusted from 0 to 35.
7
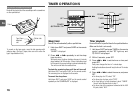
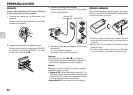
Prepare the source.
To record the radio, select the band and tune in the desired
station.
To record external equipment connected to the AUX IN
jacks, set an external timer for the equipment so that its
playback begins at the same time.
8
Insert the recording tape and then turn the unit
off.
"5 REC" remains on the display to indicate the timer
standby mode (when ECO mode is deactivated).
At timer-on time, the unit turns on and records the selected
source. After the specified timer-activated duration, the
unit turns off again.
•Connected equipment cannot be turned on or off by the built-
in timer of this unit. Use an external timer.
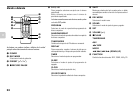
To check the timer setting
Hold down SHIFT and press TIMER on the remote control
repeatedly so that "5 PLAY" or "5 REC" appears on the
display.
The timer-on time, the source and the timer-activated duration
are displayed for 8 seconds.
To change the timer setting
Reset the timer again.
To cancel the timer
Hold down SHIFT and press TIMER on the remote control
repeatedly until "5 OFF" is displayed. "5 " or
"5 REC" disappears from the display.
Tip:
Your timer setting is retained even if the timer is canceled.
Next time the timer is activated, you can change your previous
setting, or simply use the same setting again.
5
Press f or g to set the timer-activated
duration, then press SET.
With each press, the timer-activated duration changes in
5-minute steps between 5 to 240 minutes.
6
Press f or g to adjust the volume for timer
playback, and press SET.
The volume level can be adjusted from 0 to 35.
7
Prepare the source.
To play CD, load a disc.
To play a tape, insert the tape.
To play the radio, select the band and tune in the desired
station.
To play external equipment connected to the AUX IN jacks,
set an external timer for the equipment so that its playback
begins at the same time.
8
Press POWER 6STANDBY/ON (POWER) to turn
the unit off.
"5" remains on the display to indicate the timer standby
mode (when ECO mode is deactivated).
At timer-on time, the unit turns on and plays the selected
source. After the specified timer-activated duration, the
unit turns off again.
•Timer playback will not begin unless the unit is turned off
first.
•Connected equipment cannot be turned on or off by the built-
in timer of this unit. Use an external timer.