


25
GB
Getting Started
Tips
• You can also fix the optimizer microphone to a
tripod (not supplied) and place the tripod at your
listening position.
• Be sure to remove any obstacles in the path
between the optimizer microphone and the
speakers.
• When you face the speaker towards the optimizer
microphone, you will get a more accurate
measurement.
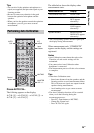
Press AUTO CAL.
The follwing appears on the display.
A.CAL [5] t A.CAL [4] t A.CAL [3] t
A.CAL [2] t A.CAL [1]
The table below shows the display when
measurement starts.
* The corresponding speaker indicator lights up in
the display during measurement.
When measurement ends, “COMPLETE”
appears on the display and the settings are
registered.
Notes
• Auto Calibration cannot detect the sub woofer.
Therefore, all sub woofer settings will be
maintained.
• You cannot select Auto Calibration when
headphone is connected.
• The measurement process will take a few minutes
to complete.
Tips
• When Auto Calibration starts:
– Stand some distance from the speakers and the
listening position to avoid measurement failure.
This is because test signals are output from the
speakers during measurement.
– Avoid making noise to get a more accurate
measurement.
• The Auto Calibration function will be canceled
when you do the following during the
measurement process:
– Press ?/1, input buttons or MUTING.
– Change the volume level.
– Press AUTO CAL again.
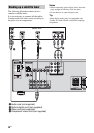
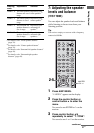
Performing Auto Calibration
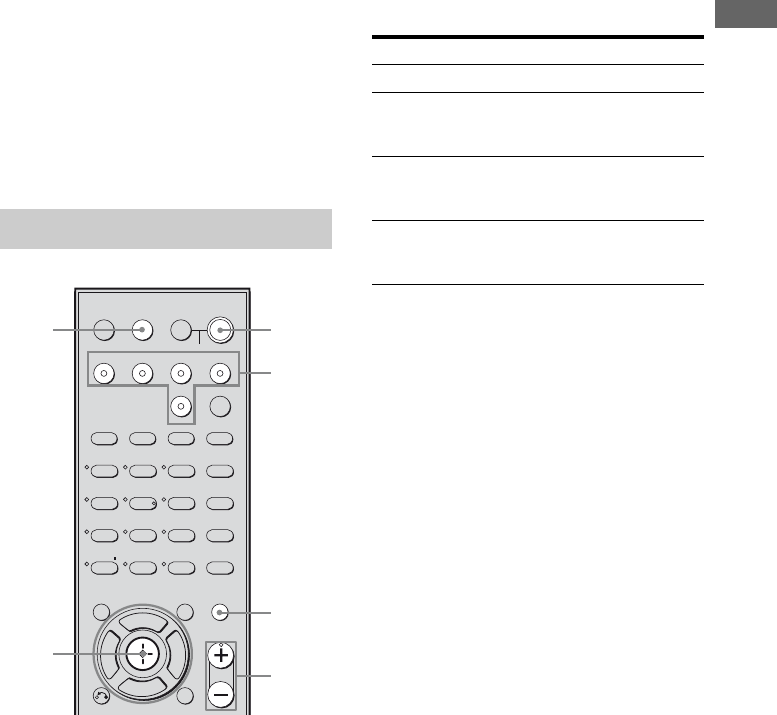
123
46
78
0/10
ENTER
9
SYSTEM STANDBY
TV/VIDEO
SLEEP
AUTO
CAL
AV
?/1
VIDEO 1 VIDEO 2 DVD SA-CD/CD
2CH A.F.D.
RETURN/EXIT MENU
MOVIE MUSIC
MEMORY DVD MENU
CLEAR
TOOLSDISPLAY
MUTING
TV VOL
MASTER VOL
FM MODE
D.TUNING
D.SKIP
DUAL MONO
TUNER
AMP MENU
TV
?/1
?/1
>10/
-
F
Gg
f
5
AUTO
CAL
Control
button
MUTING
Input
buttons
?/1
switch
MASTE
R
VOL +/–
Measurement for Display
Environment noise level NOISE.CHK
Speaker connection MEASURE and SP
DET. appears
alternately*
Speaker level MEASURE and
GAIN appears
alternately*
Speaker distance MEASURE and
DISTANCE appears
alternately*